IMS Bench SIPp
Reference Documentation
- Foreword
- Installation
- Using IMS Bench SIPp
- Concepts and Features
- Writing XML Scenarios
- Various Topics
- Getting support
- Contributing
Foreword
IMS Bench SIPp is a performance testing and benchmarking toolset designed to provide an implementation of a test system conforming to the IMS Performance Benchmark specification, ETSI TS 186 008. Please see the Introduction for more on what it can and cannot do and what this ETSI specification is all about.
IMS Bench SIPp is based on a modified SIPp and still supports the original SIPp scenario commands as well as a series of extra commands and parameters. This makes it suitable not only to test IMS core networks, as targeted by the IMS/NGN Performance Benchmark specification, but also standalone SIP proxies, SIP application servers, B2BUAs, etc., whether they are IMS compliant or not. And this can be done while still benefiting from the large-scale benchmarking capabilities, the deep automation, and the report generation functionality of IMS Bench SIPp.
In order to avoid duplication and to reduce the size of this documentation, the reader is asked to refer to the standard SIPp documentation for the general principles governing the scenario files. This reference documentation does however contain (or at least tries to) an exhaustive list of scenario commands, arguments and actions.
Installation
Obtaining the source code
IMS Bench SIPp is released under the GNU GPL license. All the terms of the license apply.
The complete source tree containing all the components of IMS Bench SIPp can be obtained from the Subversion repository at sipp.svn.sourceforge.net/svnroot/sipp/sipp/branches/ims_bench. For example, the following command creates the ims_bench directory and populates it with the latest version of the sources:
svn co https://sipp.svn.sourceforge.net/svnroot/sipp/sipp/branches/ims_bench ims_bench
Pre-requisites
-
In order to achieve around millisecond precision in scenario attempt scheduling and in timing measurements, the underlying operating system must provide sufficiently fined grained scheduling. On most Linux distributions, this requires that the kernel be rebuilt with the kernel "Timer frequency" changed to 1000 HZ. For example, on FC6:
rpm -i kernel-2.6.18-1.2798.fc6.src.rpm cd /usr/src/redhat/SPECS rpmbuild -bp --target=i686 kernel-2.6.spec cd /usr/src/redhat/BUILD/kernel-2.6.18/linux-2.6.18.i686 make menuconfig Change: Processor type and features ---> Timer frequency (1000 HZ) ---> General setup ---> () Local version - append to kernel release <- set your own kernel prefix make dep bzImage modules modules_install install (modify /etc/grub.conf to point to this new kernel) -
In order for the timing precision to remain when measuring a time difference between two different physical systems, all systems that constitute the Test System should be synchronized with a better precision than what the standard NTP protocol achieves. A simple way of doing this is to use the Precision Time Protocol (IEEE 1588) deamon , ptpd (ptpd.sourceforge.net)
 svn co https://ptpd.svn.sourceforge.net/svnroot/ptpd ptpd
 cd ptpd/trunk/src
 make
 ./ptpd -g (client side)
-
Random number generation for the statistical distributions (scenario arrival, pauses in scenarios) require the GSL library. It can be obtained from http://www.gnu.org/software/gsl and compiled from sources:
 tar xvfz gsl-1.9.tar.gz
 cd gsl-1.9/
 ./configure
 make
 make install
You may need to add the path to the library (/usr/local/lib by default) to the LD_LIBRARY_PATH environment variable or to the /etc/ld.so.conf file:
 echo /usr/local/lib/ >>/etc/ld.so.conf
 ldconfig
-
In order to be able to use the menu-driven benchmark configuration tool and the report generation tool, the following components must be installed.
- Perl XML::Simple module - http://search.cpan.org/dist/XML-Simple/
perl -MCPAN -e shell {reply with default answers... just select the local ftp server} cpan> install XML::Simple cpan> quit - Gnuplot 4.2 - http://gnuplot.sourceforge.net/
 tar xvfz gnuplot-4.2.0.tar.gz
 cd gnuplot-4.2.0
 ./configure --without-x
 make
 make install
- Perl XML::Simple module - http://search.cpan.org/dist/XML-Simple/
- Configure Virtual IPs
In case you want your test systems to support large numbers of users, you'll probably want to configure multiple virtual IP addresses on your network adapters. The actual number of IP addresses to configure will depend on the transport option you select: a single IP address per SIPp instance, in which case you need many IP addresses as you'll run SIPp instances on a same physical system, or multiple IP addresses per SIPp instance in which case you will want plenty of IP addresses.
There are at least two ways to configure virtual IP addresses:
- Through ifconfig command execution (probably from within a script)
ifconfig eth0:0 192.168.1.76/24 up
- or through the network adapter configuration files
(/etc/sysconfig/network-scripts/ifcfg-eth0:x), and applying the changes with
"service network restart"
 DEVICE=eth0:0
 BOOTPROTO=static
 TYPE=Ethernet
 IPV6INIT=no
 HWADDR=00:15:17:01:E2:E2
 IPADDR=192.168.1.76
 NETMASK=255.255.255.0
 NETWORK=192.168.1.0
 ONBOOT=yes
- Through ifconfig command execution (probably from within a script)
- Modify System Limits (/etc/security/limits.conf) to allow SIPp process to open a large number of sockets, and add:
 * soft nofile  102400
 * hard nofile  409600
Building IMS Bench SIPp components
To build SIPp and the manager in the way appropriate for the benchmark, perform the following make invocations:
 cd ims_bench
 make rmtl
 make ossl
 make mgr
Alternatively, the default make invocation (no argument) will build all these components as well as cpum, the system resource monitoring component. This might however not be what you need as the latter must be built on the system where it needs to run, i.e. the SUT, which might not be compatible with binaries built on your test systems.
To build cpum on the SUT, you will need the GNU development toolchain on your SUT or on compatible development environment. You can then copy the IMS Bench SIPp source tree and simply build cpum and its required dependencies:
 make rmtl           (on the SUT)
 make cpumem         (")
Using IMS Bench SIPp
Configuration
When configuring the test system for a benchmark run, there are two possible approaches:
- Use the ims_bench.pl perl script to enter the benchmark parameters using a menu driven user interface and automatically generate all the necessary configuration files and execution scripts
- Configure all elements manually
Obviously the first approach is the easiest but is somewhat limited to configuring benchmark runs in close accordance to the TS 186 008 specification. As IMS Bench SIPp is based on SIPp which was already very flexible and as the new features and new components (Manager, CpuMem...) were designed in the same spirit, one may configure quite a large variety of benchmark runs. When configuring manually however, the benchmark parameters as specified in TS 186 008 do not appear as clearly anymore since many of them are implemented using SIPp features that were not directly implemented based on that specification. For this reason, the names don't match and some parameters of the specification may be linked to multiple configuration bits in the IMS Bench SIPp configuration.
Manager Configuration
The configuration file for the manager, manager.xml, is an XML file with one global configuration section and one or more "run" sections.
If you used the ims_bench tool to configure your benchmark run, it will have generated this file for you in a target directory. Otherwise, you can start from the example manager.xml file provided in the source tree.
-
<configuration> section
This section of the manager configuration contains the global configuration (independent of the individual "runs" defined in subsequent sections).
-
global parameters
Each parameter entry is specified using the following syntax: <param name="name" value="value"/>
Possible parameters are described in the table below:
number_test_systems Number of Test Systems that the manager will wait for before starting the load generation. A value of 0 indicates that the manager should start immediately with the number of SIPp instances connected at the time the user presses the 'e' key. When the manager is used in full automatic mode (-e command line flag), a non-0 value must be specified. prep_offset Time (in milliseconds) allocated for the preparation portion (usually dedicated to the user reservation procedure) of a client-side scenario before its real SIP scenario portion is expected to start (according to the scenario initiation distribution). This is the scenario portion between the start and the <sync> command of the scenario. Once the scenario reaches its <sync> command, SIPp will put it to sleep until the time the SIP scenario was scheduled to start.
This parameter should be set to a value high enough to guarantee that all scenarios can reach their <sync> command in advance of their actual scheduled start time, but not too large in order not to have too many users "consumed" by scenarios in their preparation phases (risk of running out of users).rand_seed Initial seed value that will be distributed to all random number generators in the complete test system to compute their own individual seed value (this seed value is derived from the global rand_seed value, the SIPp instance ID and the specific random generator it is used for). This scheme guarantees that each SIPp instance starts at a different place in the pseudo-random sequences it uses and still allows re-generating almost exactly the same load as for a previous run by assigning the same rand_seed value.
A value of 0 tells the manager to generate the seed at random. The actual rand_seed value used is always logged into the report.xml file generated by the manager so that one can then later force the rand_seed to this value to re-generate almost the exact same load.report Report generation (1 = generate report; 0 = don't generate). Must be set to 1 in order to be able to use the report generation tool. log Manager logging (0 = disabled; 1 = enabled). The manager can log details of its activities in a manager.log file. This includes the same data as the manager screen output with the highest verbosity. transient_time Transient time (in seconds) at the begining of each step (change in the load applied to the SUT) during which scenario outcomes are ignored when computing the IHS percentage (percentage of Inadequately Handled Scenarios). scenario_path Path prefix where the scenario xml files are located. max_time_offset Maximum offest (in microseconds) allowed between each TS and the manager (0 = not checked)
-
Scenario Parameters
This provides an extension of SIPp's -key command line mechanism. It allows the manager to define the value of global generic parameters that scenarios can refer to.
Example: <scen_param name="RingTime" value="5000"/>
Scenarios can then use this value, for example in a pause command: <pause poisson="true" mean="%RingTime"/>
The name can be any name that does not conflict with pre-defined scenario keywords.
-
Scenario List
Each scenario that must be loaded is specified using the following syntax: <scenario name="name" max_ihs="value"/>
The name must represent an existing xml scenario file. max_ihs is an optional attribute defining the maximum percentage of inadequately handled scenario attempts allowed for this scenario (to be specified only for client side - "UAC-like" - scenarios).
Example of (partial) <configuration> section:
 <configuration>
   <param name="rand_seed" value="0"/>
   <scen_param name="RingTime" value="5000"/>
   <scenario name="ims_uac" max_ihs="0.1"/>
 </configuration>
-
global parameters
-
<run> sections
A run section defines a series of steps in the traffic time profile (evolution of the traffic over time) as well as which traffic set to use (percentage of each scenario). All steps of a run use the same traffic parameters except the scenario attempt rate which increases from step to step within a same run.
A configuration can have as many runs as desired to make the scenario mix change over time, or to change other parameters that are specific to a run. Runs are executed in sequence in the same order as they appear in the manager config file.
The following arguments can be specified for any run:
cps Initial rate of scenario attempts (CPS) for this step (Use 0 to define a "pause" step) max_calls Number of calls to generate for this step. Generaly used only for a pre-registration phase where only SIP registration scenarios are executed. distribution Distribution used for scenario initiation over time. Possible values: "constant", "poisson" duration Duration (in seconds) of a single step of the run. step_increase Load (scenario attempt rate) increase when moving to a next step within the run. num_steps Number of steps in the runs.
0 = no increase (a single flat load)
n = load is increased n times during the run.report This attribute has no impact on the run-time behavior of the test system but is passed on to the report generation tool. If set to "no", the steps of the run will not appear as distinct steps in the generated report and will not be listed in summary tables, etc. This is typically the case for a run used to warm up the SUT before the actual benchamrking phase starts. sync_mode If set to "off", the SIPp instances will bypasses the "sync" state of the scenarios. In this case, SIPp makes no attempt to avoid that preparation part of the scenarios delays the actual start of its SIP portion. This is generaly used for a pre-registration phase only. See also the prep_offset global parameter. use_scen_max_ihs If set to "yes" or not set (default), the max_ihs value defined for each scenario is used as threshold value against which the IHS percentage of the step is compared (on a per scenario basis) to decide whether to stop the benchmark or to move on to a next step or run.
If set to "no", the value specified under max_global_ihs run parameter (see below) is used as threshold value for all scenarios and the per scenario max_ihs threshold is ignored for this run. This can be useful for example in warm-up runs done as part of the overall benchmark execution (so it is always done the same way) and where a higher number of failures can be accepted. These warm-up runs would then use a higher IHS threshold than the subsequent "real" runs.max_global_ihs Maximum allowed percentage of IHS for the run, evaluated over all scenarios executed regardless of their specific max_ihs value. See also the use_scen_max_ohs parameter. stats Interval (in milliseconds) at which the manager requests counters from the SIPp instances to evaluate the progress of the test and display it. The scenario mix is also part of the configuration of a run. The first run must specify the ratio of each scenario. Subsequent run sections only need to specify this if the scenario mix must be changed. Otherwise, the same ratios as in the previous run are used.
Scenario ratios are specified using the following syntax: <scenario name="name" ratio="value"/>
Only the client scenarios (intiating side) should be specified. The sum of the ratios of all scenarios must be equal to 100, including the ratios that have been configured in earlier runs. This means that if a specific scenario was executed in the previous run and should not be executed anymore, one must explicitly set its ratio to 0 in the new run.
Example run section:
<!-- Stir phase to warm up the SUT -->
<run cps="40" duration="75" step_increase="20" num_steps="3" distribution="poisson" \
     use_scen_max_ihs="no" max_global_ihs="1" stats="2000" report="no">
  <scenario name="ims_reg"   ratio="2.5"/>
  <scenario name="ims_uac"   ratio="50"/>
  <scenario name="ims_dereg" ratio="2.5"/>
  <scenario name="ims_msgc"  ratio="30"/>
  <scenario name="ims_rereg" ratio="15"/>
</run>
Benchmark Execution
Running
In case you configured your test system using the ims_bench Perl script, you will have received detailed instructions at time of exiting the configuration tool. Please follow those instructions which will guide you through the deployment of the components (using the prepare.sh script) on the systems used for the test and the starting of all components (manager and SIPp instances).
In all cases, the first step is to start the manager on the system that you intend to use as central controller for the benchmark.
./manager [-f manager.xml]
It will then read its configuration file and wait for SIPp agents and resource monitoring agents (cpum) to connect.
The next step consists in starting the SIPp instances. Each instance must be
started with the necessary options to make it use the IP address(es) you configured
for it, to connect back to the manager as remote control and to load the user
information for the users it will represent. The file containing the user data must
be present on the system where the SIPp instance runs. The scenario files however
are not needed locally since they will be sent over the network by the manager.
Each instance should also have its test system ID specified by means of the -i
option (although this is optional, it simplifies things a bit because SIPp will then
be able to use, in csv file names for example, this TS ID which is guaranteed to be
unique even across multiple systems, instead of the local process id).
The -trace_scen and -trace_retrans options are also required if you want to generate
a report for the run (usually the case).
Here is an example of the command to issue on one of the test systems to start one of the SIPp instances, assuming that the manager is at 192.168.1.1, that the instance will use 192.168.1.20 and that the SUT is at 192.168.1.100 and listens for SIP traffic on port 5060:
./sipp -id 1 -i 192.168.1.20 -user_inf ./ims_users_1.inf
       -rmctrl 192.168.1.1:5000 192.168.1.100:5060
       -trace_err -trace_cpumem -trace_scen -trace_retrans
If you used the ims_bench tool to prepare the benchmark configuration, it will have created the necessary scripts for you (run_x.sh) and you can simply start those on the test systems as you'll have been instructed by the tool.
If you have built the resource monitoring tool - cpum - for your system under test, you should start it on the SUT now (unless it's already running from a previous run). It will connect to the manager and report the SUT CPU and memory utilization data.
./cpum 192.168.1.1:5000 (on the SUT)
You can watch on the console of the manager, the various systems connecting to it. Once all components are started, you can start the actual execution by pressing the 'e' key in the manager console.
While the test system manager executes the runs according to its configuration, it also monitors the percentage of inadequately handled scenarios (IHS) during each step, and decides, based on the configured maximum value allowed for the IHS percentage, whether to perform the next step, increasing the load on the SUT, or not.
As the manager moves from step to step within a configured run and from one run to the next, it writes these transitions to a report file it generates. This report file, report.xml, also contains information about the test systems used, the overall benchmark configuration, etc.
Once the IHS threshold has been exceeded, the manager instructs the SIPp instances to stop applying load to the SUT and reports that the test is finished. You can then press the 'q' key in the manager console. This will stop all connected SIPp instances and the manager itself.
Gathering Results
As each SIPp instance dumps most of its statistics on the local system it
runs on (that's because sending it in real time to the manager could make the
manager a bottleneck in the system), if you used multiple physical systems to
execute the benchmark, you will need to gather together the csv files from
each SIPp instance. In addition, prior to running the report generation tool,
it is required to merge together the data from all the SIPp instances.
A simple script is provided that reads the manager report file to learn the
IP addresses of the test systems and the PID or TS ID of their SIPp instances,
then grabs the corresponding files using scp and merges them together
(assuming you are in a subdirectory as created by ims_bench script or
that you created yourself for the execution):
../scripts/getResults.pl
In case you copied the files manually from the test systems, you can use the same script to only perform the merging operation:
../scripts/getResults.pl -merge
This merging operation can take some time if the amount of data collected was very large. It produces the following files:
- sipp.csv resulting from the merge of all sipp_TS<ts_id>_scen.csv files
- sipp_retrans.csv resulting from the merge of all sipp_TS<ts_id>_retrans.csv files
Note: After the merge completes, you can delete the partial files by running
../scripts/getResults.pl -cleanBut be sure the merge operation completed successfully (e.g. did not run out of disk space!) as the original files will be deleted (but only on the local system, not on the remote location where the SIPp instances actually executed - unless it is the same machine and location).
Screens and Keys
Manager
- Main keyboard keys:
Key Description # Change the display verbosity level e Execute the benchmark 0-9,<,>,D,q Keys are directly sent to all SIPp clients T Measure the time difference in micro seconds (Manual/Debug) t Request the Date Time Stamp in text format (Manual/Debug) g Request Counters (Manual/Debug) r Reset Clients (Manual/Debug) l Load Scenarios (Manual/Debug) W/w Request CPU (Manual/Debug) - When starting, the manager displays a summary of the configuration and
the requested runs.
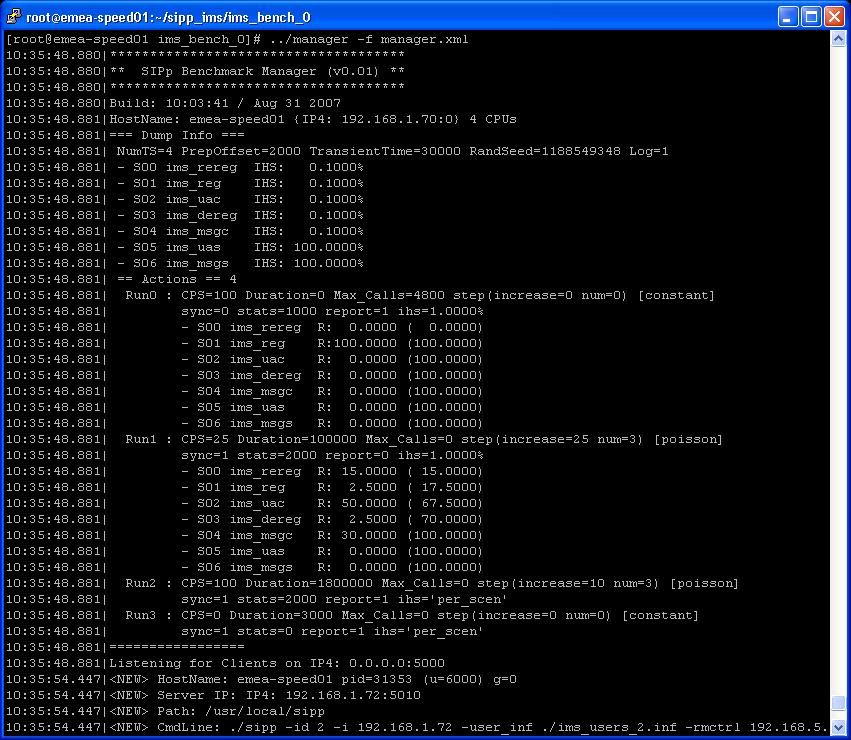
- After launching the benchmark execution (pressing 'e' key), the manager starts
executing the runs. The first run could for example consist in a pre-registration
phase where a certain percentage of the user population is registered with the SUT
before the actual benchmark run really starts. In this example, only the
ims_reg scenario is active.
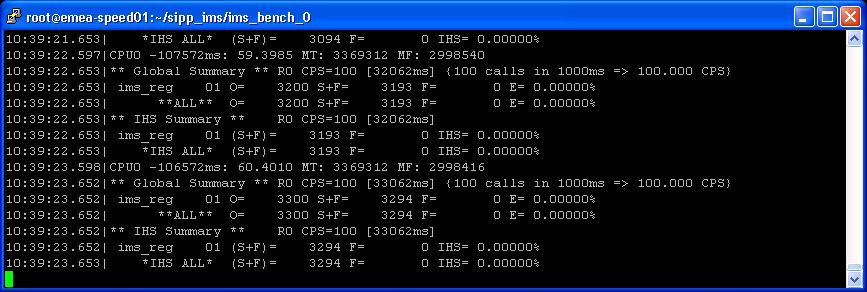
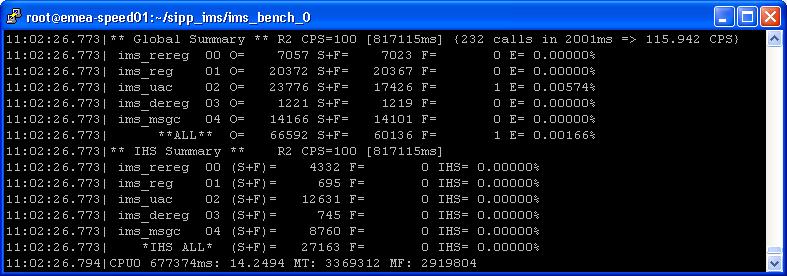
- At run time, the manager displays global summary and the current percentage
of Inadequately Handled Scenarios for the step. If cpumem is connected, the cpu
utilization of the SUT(s) will be reported too.
CpuMem
- The following screen represents the CpuMem utility output.
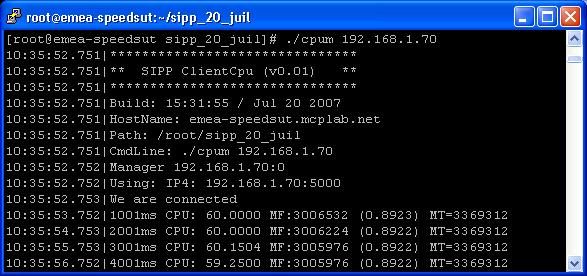
There is no runtime key. Press ctrl-c to exit the utility.
SIPp
-
Main keyboard keys:
Key Description <,> Select a particular scenario. Most data displayed on the screen is related to the currently selected scenario. 1 Switch to the 'Scenario' screen 2 Switch to the 'Statistics' screen 3 Switch to the 'Repartition' screen 4 Switch to the 'Variables' screen 5 Switch to the 'TDM map' screen 6,7,8,9,0 Switch to the corresponding 'Secondary repartition' screen ('6' for RTD 1, '7' for RTD 2, etc.) D Debug screen (dump internal variables) -
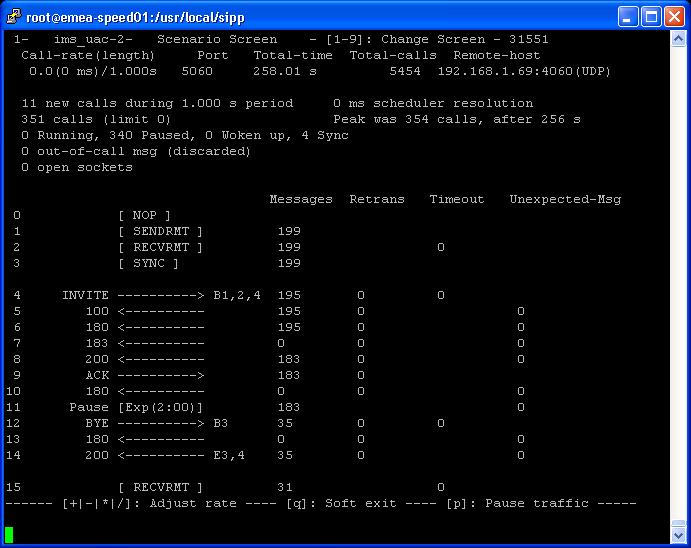
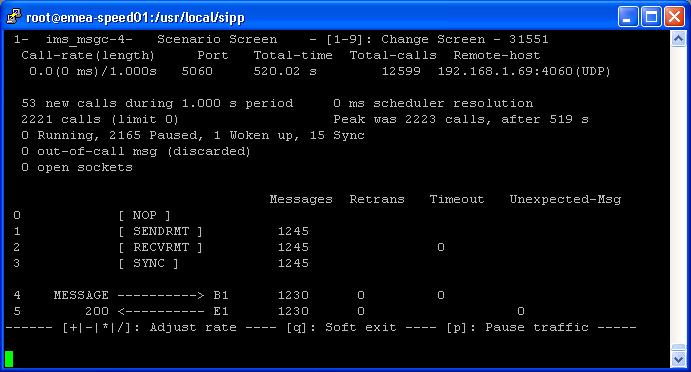
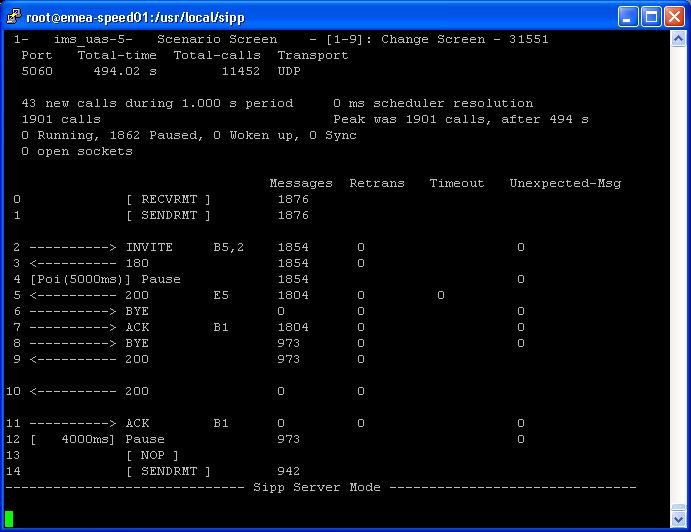
Key '1': Scenario screen.
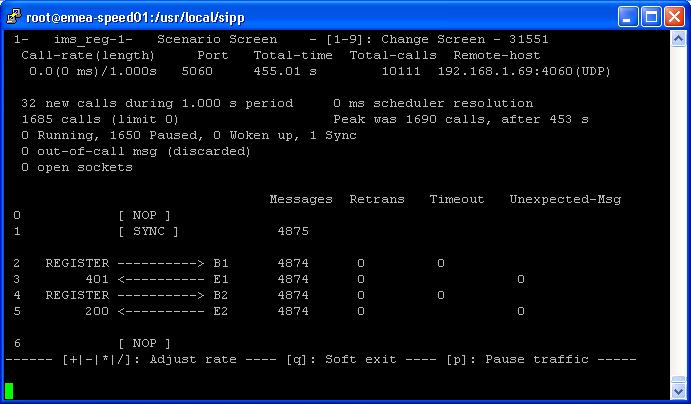
It displays a call flow of the scenario as well as some important informations.
- Screen Layout
<TS_id>- <scenario_name>-<scen_slot>- Scenario Screen - [1-9]: Change Screen - <PID>
Client:Call-rate(length) Port Total-time Total-calls Remote-host [Desactivated](0 ms)/1.000s 5060 10.00 s 0 <sut_address>(UDP) 0 new calls during 1.000 s period 1 ms scheduler resolution 0 calls (limit 0) Peak was 0 calls, after 0 s 0 Running, 0 Paused, 0 Woken up, 0 Sync 0 out-of-call msg (discarded) 0 open sockets
Server:Port Total-time Total-calls Transport 5060 695.00 s 0 UDP 0 new calls during 1.000 s period 1 ms scheduler resolution 0 calls Peak was 0 calls, after 0 s 0 Running, 0 Paused, 0 Woken up, 0 Sync 0 open sockets
The following screenshots give examples with some of the scenarios included with IMS Bench SIPp.
- IMS Registration Scenario
- IMS UAC Scenario
- IMS Messaging (Client) Scenario
- IMS UAS Scenario
- Screen Layout
-
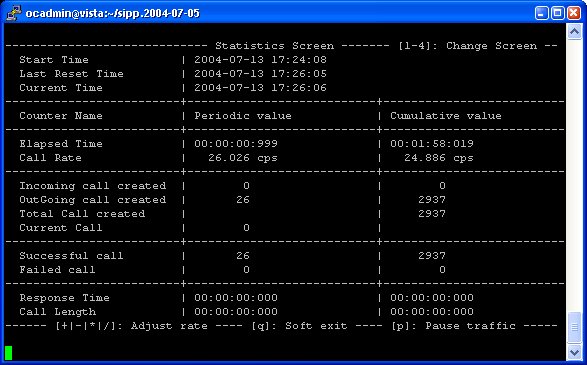
Key '2': Statistics screen.
It displays the main statistics counters. The "Cumulative" column gathers
all statistics, since SIPp has been launched. The "Periodic" column gives the
statistic value for the period considered (specified by
-f frequency command line parameter).
-
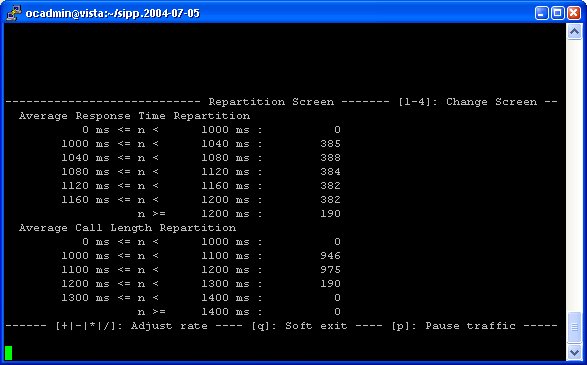
Key '3': Repartition screen.
It displays the distribution of response time and call length, as
specified in the scenario.
-
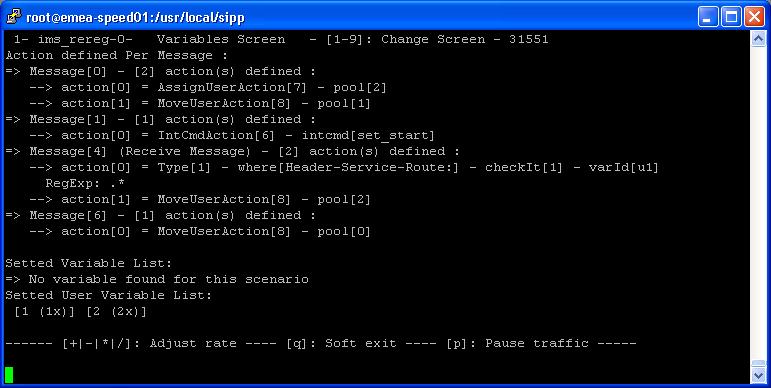
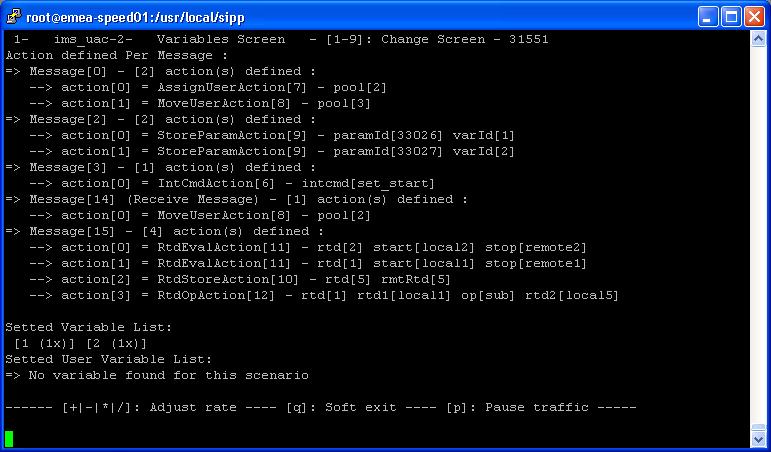
Key '4': Variables screen.
It displays information on actions in scenario as well as scenario
variable information.
- IMS Registration scenario
- IMS UAC scenario
- IMS Registration scenario
Generating Reports
A perl script, doReport.pl, can be used to generate a report in MHT format (Multipurpose Internet Mail Extension HTML - RFC 2557), containing graphs and statistics about the test.
Note: As of this writing, the Mozilla Firefox browser did not support this format out of the box. Microsoft Internet Explorer 6 supports it natively. Although the MHT format is very convenient to group the HTML and picture files, one can also view the HTML directly as long as the picture files remain at the same relative paths.
This tool takes as input data from the following sources:
- SIPp metrics data contained in the merged csv files (resulting from the usage of the getResults.pl script (scenario attempts, outcome, timings).
- CPU and memory utilization data gathered from the cpum resource monitoring tool running on the System Under Test and on the test systems
- general information about the run (step start times, scenario attempt rate,...) from the file generated by the manager during the benchmark run (report.xml)
- metric related information (name, mapping with csv file...) from the XML scenario files.
The report is made up of multiple sections. The first section, the summary, is only configurable as far as the static text included is concerned and is otherwise built automatically by the tool. The subsequent sections contain graphs and statistics tables representing measurements like Scenario Attempts per Second (SAPS), response times, CPU utilization, etc. Those are configurable. See below for details on the report configuration.
Configuring the Report Content
The configuration for the report generation tool is located in the reportConfig.xml file (default - can be overwritten on the command line). It tells the tool which graphs must be plotted, gives descriptions and titles for these graphs and also contains some general parameters.
The reportConfig.xml file included in the source tree allows you to generate a report matching the requirements of the ETSI TS 186 008 specification (within the existing limitations of the current IMS Bench SIPp implementation). You only need to modify this file if you intend to change what data is reported (for example you added new scenarios for a new use case) or the way the data is presented (type of graph, legend, description...).
General parameters
| DisplayFailureStep | Set to 0 to prevent the failure step from appearing in time based graphs. This is usually set to 1. |
| DisplayFailureStepHistograms | Set to 1 to show the Failure Step in the Histograms. This is usually set to 0, as failure steps usually contain very few data and tend to render the other histograms unreadable. |
| DisplayConstantHistograms | Set to 1 to display constant steps in histograms. This is usually 0, as otherwise histograms for other steps often become unreadable. |
| size → x and size → y | Horizontal and vertical size of the graphs |
Graphs
All measurements can be represented as time based graphs and/or as histograms.
Time based graphs usually have the time as X-coordinate, the measure as Y1-coordinate and SAPS as Y2-coordinate. The SAPS (scenario attempts per second) in such graphs can be calculated for the whole system (default), per use case (use case attempts per seconds, for example grouping together REGISTER, DE-REGISTER and RE-REGISTER scenarios) or per scenario (only REGISTER scenarios per second for example).
Each graph is configured within a <measure> section in the report
configuration. As already mentioned, a measure can be evaluated for the
whole system (default), in which case the <measure> section should
appear at the top-level (within <config> section). But the measure
can also be done per use case, in which case the <measure> section
should appear within the corresponding <use_case> section.
Finally, the measure can also be done per scenario, in which case the
<measure> section must appear within a <scenario> section.
Use case names and scenario names are the names referenced in the scenario
XML files. Check out the provided default reportConfig.xml file for
examples.
The following parameters describing the way to present the measurement may appear within a <measure> section: (parameters in italic are optional):
| Title | Title of the Graph, as it will appear in the report |
| Description | Description of the data being measured to be displayed in the report |
| Source | The Source can be either one of the following keyword :
|
| AxeX | Description of X axis |
| AxeY | Description of Y axis |
| Ignore | If set, no graph is generated for the measurement (easy way to add/remove graphs without actually removing them from the reportConfig.xml file) |
| UnitX | Scaling factor along the X axis. For instance, time is reported in the csv files as milliseconds, while it makes more sense to display it as seconds in the report; hence, UnitX would be 1000. |
| UnitY | Scaling factor along the Y axis (same as UnitX, but for Y-coordinate). For instance, response times in csv files are in micro-seconds, while milliseconds would be more appropriate for most graphs; UnitY would then be 1000. |
| LegendY | The legend to associate with the plot of the measurement. |
| InSummary | If present, the data (mean value over each step) is also included in the summary table at the beginning of the report. The parameter value is used as heading in the summary table. |
| Logscale | If set, the graph is logarithmic and the value of this parameter is used as minimum value to display. |
| DistAndHistoUnit | Grouping Unit for DistrBasedGraph and ProbaBasedGraph graphs. Metrics related data from csv files (timestamps) are in microseconds, but when making histograms, it is probably desired to group data as otherwise there would be too few measurements at the exact same value to build a meaningful histogram. If set to 100 for instance, it means that histogram unit will be 100 micro-seconds and all data will be rounded up to 100 micro-seconds. If, at the same, time UnitY is set to 1000 (milli-seconds), the resulting histogram will have 10 points (1000/100) for each milliseconds. |
Measurements can be plotted in different forms. All forms can be used for all measurements, but some forms are more appropriate than others for some measurements. The type of graph for measurement is specified by including one of the following parameters within the <measure> section.
Types of graphs
| MeanBasedGraph | In the 'MeanBasedGraph' format, the measurements are presented as mean per second. This is useful for metrics for instance. |
| TimeBasedGraph | In the 'TimeBasedGraph' graph format, the raw
measurement data is plotted. Obviously, this graph can be used for any
measurements like CPU, memory, retransmit per second (which, by definition,
are already per second, and for which calculating a mean per second would not
bring anything). It can also be used for plotting delay between two scenarios for instance (because the mean per second does not have that much sense in this case). |
| DistrBasedGraph | In the 'DistrBasedGraph' graph format, data are shown in the form of an histogram. This graph can be used for instance for plotting SAPS (allowing to verify that the generated load follows the expected random distribution), or other metrics for which it is interesting to see the way the values are distributed. |
| ProbaBasedGraph | This type of graph shows the probability of a measure to be higher than a certain value. Mathematically speaking, it is 1 - integral (histogram). It is very helpful as it can be used to deduce various percentile values. |
Each of the four graph types can have sub-parameters:
| For all graph types | |
|---|---|
| Description | Specific description for the graph |
| bezier | If set to 1, a bezier curve is included on the graph. This is usually useful for Time- and Mean- based graphs. |
| Theoretical | If set, a theoretical curve is plotted in addition
to the actual measurement. Supported values are 'Poisson' and 'Expo'. This is helpful in comparing Poisson or Exponential distributions to their expected theoretical curve. |
| For Mean- and Time- based graph types | |
| Source | If specified within a Mean- or Time- based graph section, this indicates the source of a second data set to be plotted on the same graph as the primary one (multi-plot graphs). The parameter can take the same values as described above when used for the primary graph (at the <measure> level). |
| AxeY | For a multi-plot graph, specifies the text to show along the second Y axis (for the data coming from the second source). |
| LegendY | For a multi-plot graph, specifies the text to use as legend associated with the second plot. |
Executing doReport.pl
The help screen of doReport.pl shows the command line options it supports:
 Syntax: doReport.pl [-r <report_file>] [-c <report_config_file>]
                     [-i <ims_bench_file>] [-F<0|1>]

 -r specifies the raw benchmark report file (default: report.xml) resulting
    from the run you want to generate a graphical report for.
 -c specifies the configuration file for this script (default: reportConfig.xml)
 -b specifies an optional benchmark info HTML fragment file to include as
    introduction in the report (a default generic sentence is otherwise provided)
 -i specifies the ims_bench config file (in case the benchmark run was
    configured using the ims_bench script), containing IMS benchmark parameters.
 -F specifies whether gnuplot should be forked (to benefit from multiple CPU
    cores). -F0 disables the forking (default: enabled)
 -? to get this help.
doReport.pl expects to find the csv data files, the report.xml file
and the scenario files in the current directory.
You can however execute it from anywhere where you have these files
present as it will look for its own files
(reportConfig.xml unless specified through -c command line option, some
small picture files, etc.) at the path present in the command line.
It is therefore common to execute it from the same location where you
ran the manager during the benchmark run (the ims_bench_xyz
directory in case the benchmark run was prepared by the ims_bench tool).
For example:
../scripts/doReport.pl -i ims_bench.xml
You can however overwrite the reportConfig.xml file as well as the logo file (logo.png - displayed in the top left corner of reports) by putting your own versions of these files in the current directory. doReport.pl first looks for them in the current directory and then at the same location where the script itself resides.
Concepts and Features
Multi-scenario mode
Scenarios can be classified as either client-side or server-side.
A client-side scenario is a scenario that starts by initiating
a SIP transaction or a non-SIP message exchange with a partner
SIPp instance (usually in a preparation phase of the scenario where
scenario and user reservation is performed).
A server-side scenario is one that starts by the reception of
the first message of a SIP transaction or the reception of a
message from a partner SIPp instance.
Client-side scenarios are initiated by the SIPp instances
according to the scenario initiation scheduling (e.g. Poisson
distribution of the delays between two consecutive scenarios)
and start executing their sequence immediately. The exact
scenario to execute from the list of client-side scenarios loaded
is selected at random according to the configured relative
occurrences of the scenarios in the scenario mix.
In the benchmark configuration, client-side scenarios are
identified by the fact that they have a ratio
attribute that specifies their relative occurrence in a specific
run section of the benchmark configuration (See also
Manager Configuration - <run> sections).
In IMS Bench SIPp, server-side scenarios are only instantiated when receiving, from a partner SIPp instance executing a client-side scenario, a request for preparing execution of a specific server-side scenario. The client-side scenario is therefore the controlling side and a server-side scenario always has at least one associated client-side scenario that will trigger its invocation. If a server-side scenario has no client-side counterpart in the benchmark configuration, it will never be executed.
A client-side scenario Si running on SIPp instance X requests a partner SIPp instance Y (association made at random for the duration of the call) to instantiate the server-side scenario Si' by sending a non-SIP req_user message to Y, telling it the ID of the server-side scenario to instantiate as well as the SIP URI of the emulated user at X from whom the first SIP message of the actual SIP scenario portion will come (SIP From header). SIPp instance Y will then be ready to receive this first SIP message and will match it, based on the received From header, with the call instantiated for the server-side scenario Si'. SIPp instance Y will then update its internal SIP CallId map so that it can, from then on, directly dispatch subsequent messages for the same call to the corresponding call running the Si' scenarion.
Note: This fairly complex mechanism was designed to allow multiple SIPp instances to place calls between them through a System Under Test that could potentially modify the SIP CallId between both call legs. This is typically the case with SUTs behaving as a B2BUAs. IMS Bench SIPp should work in the situation just the same way as it works with SUTs that simply proxy the calls leaving the CallId unmodified. It also provides for a very realistic test system where a specific test system agent (SIPp instance) from the setup not only places calls towards itself but also to all other test system agents. Otherwise, users represented by a SIPp instance X would only call (or interact with) other users also represented by SIPp instance X.
User oriented mode
Also quite central to IMS Bench SIPp for its implementation of the IMS Performance Benchmark is its user oriented mode. It is triggered by the usage of the -user_inf command line parameter which specifies a file containing data for the SIP users that the SIPp instance will represent in its interactions with the SUT.
The way this is implemented is very simple and relies on the following basic elements:
- SIPp maintains user entities that contain static data fields, and variables
- SIPp also maintains a set of user pools into which users are placed. The actual meaning of these pools is really defined by the way the scenarios use them but they are meant to loosely represent user state.
- New actions allow XML scenarios to assign a user from a
specific pool to a call (scenario instance) and to move the
currently assigned user to a different pool.
This effectively gives a meaning to each pool. For example, a registration scenario will always pick users from a pool that represents the not-registered users, and upon successfull registration will move them to the pool of registered users. A successful calling scenario would then pick users from the pool of registered users, etc. - Similarly to call variables, values resulting for example from regular expression matching can be assigned to user variables of the user currently assigned to the call. The interest of user variables vs call variables is that they preserve their value between multiple scenario invocations. For example, the Service-Route header returned during a registration can be stored in a user variable in then later injected as Route header in the INVITE a calling scenario creates.
In addition, IMS Bench SIPp will assign a different combination of IP address and UDP port number to each user that it represents. This makes the traffic more realistic. Depending on the transport mode used, it will distribute the users on the configured IP addresses and then on the available ports on that address (see also SIPp Transport Modes).
Time Metrics
SIPp supports starting timers and stopping timers. It also supports specifying timeouts on <recv> commands. However, the original SIPp did not provide a way to verify that a measured time (called Response Time Duration, RTD) is within an allowed range for the scenario to be considered as correctly handled unless it exactly matched a receive timeout. IMS Bench SIPp provides such a mechanism by which a call can be marked as inadequately handled if one of the measured RTD exceeds a predefined maximum value, even though the scenario executed correctly from the sequence and SIP protocol point of view.
This is then reflected in statistics as well as in the percentage of inadequately handled scenarios that the IMS Bench manager determines at run-time when deciding whether to move to a next step in the load profile or not.
In IMS Bench SIPp, the timing measurements that must be collected in the scenario CSV result file (when using the -trace_scen option) and that can be checked against a specified maximum value are called "metrics".
These metrics are defined within the scenario file in a
  <info>
   <metric ref="PX_TRT-REG1" rtd="1" max="2000"/>
   <metric ref="PX_TRT-REG2" rtd="2" max="4000"/>
  </info>
The above example defines two time metrics to be checked against corresponding maximum values. For each metric, the RTD (SIPp timer) into which it will be computed by the scenario is specified as well as the maximum accepted value.
The checks are done at the end of the scenario execution (if successful from a message sequence and protocol timeouts point of view), and in case a maximum value is exceeded, the call is marked as failed.
The metric name specified in the ref attribute is not used by SIPp itself but by the report generation tool. It makes the link between the time metric name (for example as defined in a benchmark specification) and the RTD used to measure it within the SIPp scenario.
In the example above, the first metric is declared to be computed in RTD 1 and is not allowed to exceed 2000 milliseconds. The second one is computed in RTD 2 and may not exceed 4000 ms. The RTD values result from the usage of the start_rtd and rtd attributes on <send> or <recv> commands, or from computations performed on RTD values by RTD related Actions.
The <metric> elements also tell SIPp which rtd values to dump into the scenario CSV result file when the -trace_scen command line option is used. Also note that the max attribute is actually optional so that it's possible to dump an RTD to the scenario CSV file even when it does not need to be checked against a maximum value.
Traffic control
In IMS Bench SIPp, the traffic is controlled by the benchmark manager according to its configuration. The SIPp instances generate SIP traffic (scenario mix, average number of new scenario attempts per second) according to the instructions they receive from the manager. The traditional keys used in the original SIPp to control the number of calls started per second are disabled in IMS Bench SIPp mode.
You can still pause the traffic by pressing the 'p' key and resume it by pressing 'p' again, but this will of course disturb your benchmark run. SIPp will stop placing new calls and will continue executing the scenario of already running calls.
In IMS Bench mode, SIPp normally quits when you press 'q' in the console of the manager or when the manager exits.
The 'q' key is however still handled in the SIPp instance as well. If you press it,
SIPp will stop placing new calls and will wait until all current calls go to their end.
During this phase,
You can also force SIPp to quit immediatly by pressing the 'Q' key, or by pressing the 'q' key again several times. Current calls will be terminated by sending a BYE or CANCEL message (depending if the calls have been established or not).
Writing XML Scenarios
IMS Bench SIPp comes with a set of scenarios to execute the IMS/NGN Performance Benchmark and some additional scenarios to use the IMS Bench SIPp test system against simpler SIP servers. You might however need to adapt those to your needs or write new scenarios for your particular testing or benchmarking needs.
A SIPp scenario is written in XML (a DTD that may help you write SIPp scenarios does exist and has been tested with jEdit - this is described in a later section). A scenario will always start with:
<?xml version="1.0" encoding="ISO-8859-1" ?>
<scenario name="Some name">
And end with:
</scenario>
Easy, huh? Ok, now let's see what can be put inside. You are not obliged to read the whole table now! Just go in the next section for an example.
List of commands with their attributes
| Command | Attribute(s) | Description | Example |
|---|---|---|---|
| <send> | retrans | Used for UDP transport only: it specifies the T1 timer value, as described in SIP RFC 3261, section 17.1.1.2. | <send retrans="500">: will initiate T1 timer to 500 milliseconds (RFC3261 default). |
| start_rtd | Starts one or more of the 5 "Response Time Duration" timer. (see statistics section). | <send start_rtd="2,3">: the timers number 2 and 3 will start when the message is sent. | |
| rtd | Stops the listed "Response Time Duration" timer. | <send rtd="2, 4">: the timers number 2 and 4 will stop when the message is sent. | |
| crlf | Displays an empty line after the arrow for the message in main SIPp screen. | <send crlf="true"> | |
| lost | Emulate packet lost. The value is specified as a percentage. | <send lost="10">: 10% of the message sent are actually not sent :). | |
| next | You can put a "next" in a send to go to another part of the script when you are done with sending the message. See conditional branching section for more info. | Example to jump to label "12" after sending an ACK: <send next="12">
<![CDATA[
ACK sip:[service]@[remote_ip]:[remote_port] SIP/2.0
Via: ...
From: ...
To: ...
Call-ID: ...
Cseq: ...
Contact: ...
Max-Forwards: ...
Subject: ...
Content-Length: 0
]]>
</send>
|
|
| test | You can put a "test" next to a "next" attribute to indicate that you only want to branch to the label specified with "next" if the variable specified in "test" is set (through regexp for example). See conditional branching section for more info. | Example to jump to label "6" after sending an ACK only if
variable 4 is set: <send next="6" test="4">
<![CDATA[
ACK sip:[service]@[remote_ip]:[remote_port] SIP/2.0
Via: ...
From: ...
To: ...
Call-ID: ...
Cseq: ...
Contact: ...
Max-Forwards: ...
Subject: ...
Content-Length: 0
]]>
</send>
|
|
| counter | Increments the counter given as parameter when the message is sent. A total of 5 counter can be used. The counter are saved in the statistic file. | <send counter="1">: Increments counter #1 when the message is sent. | |
| <recv> | response | Indicates what SIP message code is expected. | <recv response="200">: SIPp will expect a SIP message with code "200". |
| request | Indicates what SIP message request is expected. | <recv request="ACK">: SIPp will expect an "ACK" SIP message. | |
| optional | Indicates if the message to receive is optional. In case of an optional message and if the message is actually received, it is not seen as a unexpected message. | <recv response="100" optional="true">: The 100 SIP message can be received without being considered as "unexpected". | |
| crlf | Displays an empty line after the arrow for the message in main SIPp screen. | <recv crlf="true"> | |
| rrs | Record Route Set. if this attribute is set to "true", then the "Record-Route:" header of the message received is stored and can be recalled using the [routes] keyword. | <recv response="100" rrs="true">. | |
| auth | Authentication. if this attribute is set to "true", then the "Proxy-Authenticate:" header of the message received is stored and is used to build the [authentication] keyword. | <recv response="407" auth="true">. | |
| start_rtd | Starts one of the 5 "Response Time Duration" timer. (see statistics section). | <recv start_rtd="4">: the timer number 4 will start when the message is received. | |
| rtd | Stops one of the 5 "Response Time Duration" timer. | <recv rtd="4">: the timer number 4 will stop when the message is received. | |
| lost | Emulate packet lost. The value is specified as a percentage. | <recv lost="10">: 10% of the message received are thrown away. | |
| action | Specify an action when receiving the message. See Actions section for possible actions. | Example of a "regular expression" action:<recv response="200">
<action>
<ereg regexp="([0-9]{1,3}\.){3}[0-9]{1,3}:[0-9]*"
search_in="msg"
check_it="true"
assign_to="1,2"/>
</action>
</recv>
|
|
| next | You can put a "next" in an optional receive to go to another part of the script if you receive that message. See conditional branching section for more info. | Example to jump to label "5" when receiving a 403 message: <recv response="100"
optional="true">
</recv>
<recv response="180" optional="true">
</recv>
<recv response="403" optional="true" next="5">
</recv>
<recv response="200">
</recv>
|
|
| test | You can put a "test" in an optional receive to go to another part of the script if you receive that message only if the variable specified by "test" is set. See conditional branching section for more info. | Example to jump to label "5" when receiving a 403 message only if
variable 3 is set: <recv response="100"
optional="true">
</recv>
<recv response="180" optional="true">
</recv>
<recv response="403" optional="true" next="5" test="3">
</recv>
<recv response="200">
</recv>
|
|
| chance | In combination with "test", probability to actually branch to another part of the scenario. Chance can have a value between 0 (never) and 1 (always). See conditional branching section for more info. |
  <recv response="403" optional="true" next="5" test="3" chance="0.90">
  </recv>
90% chance to go to label "5" if variable "3" is set. |
|
| counter | Increments the counter given as parameter when the message is received. A total of 5 counter can be used. The counter are saved in the statistic file. | <recv counter="1">: Increments counter #1 when the message is received. | |
| regexp_match | Boolean. Indicates if 'request' ('response' is not available) is given as a regular expression. If so, the recv command will match against the regular expression. This allows to catch several cases in the same receive command. | Example of a recv command that matches MESSAGE or PUBLISH or SUBSCRIBE requests:<recv request="MESSAGE|PUBLISH|SUBSCRIBE" crlf="true" regexp_match="true"> </recv> |
|
| <pause> | milliseconds | Specify the pause delay, in milliseconds. When this delay is not set, the value of the -d command line parameter is used. | <pause milliseconds="5000"/>: pause the scenario for 5 seconds. |
| variable | Indicates which call variable to use to determine the length of the pause. | <pause variable="1" /> pauses for the number of milliseconds specified by call variable 1. | |
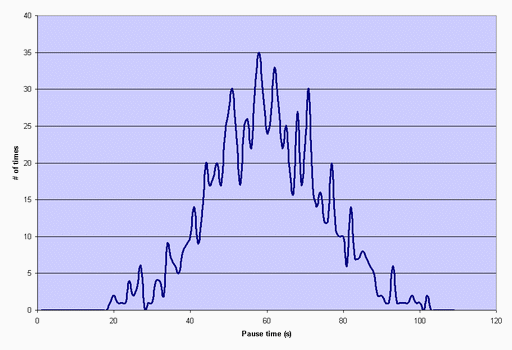
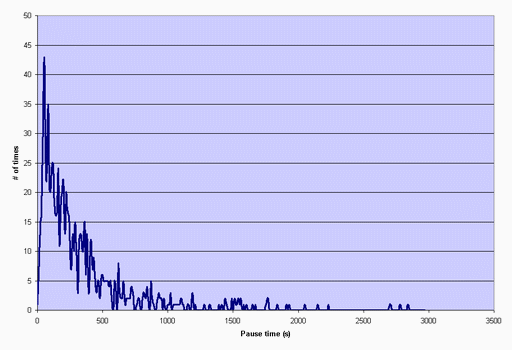
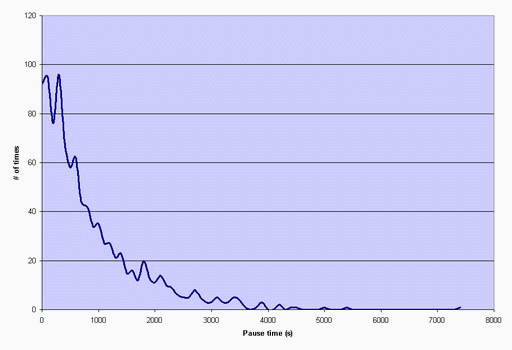
| distribution | Indicates which statistical distribution to use to determine the length of the pause. Without GSL, you may use uniform or fixed. With GSL, normal, exponential, gamma, lambda, lognormal, negbin, (negative binomial), pareto, and weibull are available. Depending on the distribution you select, you must also supply distribution specific parameters. |
The following examples show the various types of distributed pauses:
|
|
| crlf | Displays an empty line after the arrow for the message in main SIPp screen. | <pause crlf="true"> | |
| next | You can put a "next" in a pause to go to another part of the script when you are done with the pause. See conditional branching section for more info. | Example to jump to label "7" after pausing 4 seconds:<pause milliseconds="4000" next="7"/> |
|
| <nop> | action | The nop command doesn't do anything at SIP level. It is only there to specify an action to execute. See Actions section for possible actions. | Execute the play_pcap_audio/video action:<nop>
<action>
<exec play_pcap_audio="pcap/g711a.pcap"/>
</action>
</nop>
|
| start_rtd | Starts one of the 5 "Response Time Duration" timer. (see statistics section). | <nop start_rtd="1">: the timer number 1 starts when nop is executed. | |
| rtd | Stops one of the 5 "Response Time Duration" timer. | <nop rtd="1">: the timer number 1 will stops when nop is executed. | |
| <sendCmd> | <![CDATA[]]> | Content to be sent to the twin 3PCC SIPp instance. The Call-ID must be included in the CDATA. In 3pcc extended mode, the From must be included to. |
<sendCmd>
  <![CDATA[
    Call-ID: [call_id]
    [$1]

   ]]>
</sendCmd>
|
| dest | 3pcc extended mode only: the twin sipp instance which the command will be sent to | <sendCmd dest="s1">: the command will be sent to the "s1" twin instance | |
| <recvCmd> | action | Specify an action when receiving the command. See Actions section for possible actions. | Example of a "regular expression" to retrieve what has been send by a sendCmd command:<recvCmd>
<action>
<ereg regexp="Content-Type:.*"
search_in="msg"
assign_to="2"/>
</action>
</recvCmd>
|
| src | 3pcc extended mode only: indicate the twin sipp instance which the command is expected to be received from | <recvCmd src = "s1">: the command will be expected to be received from the "s1" twin instance | |
| <label> | id | A label is used when you want to branch to specific parts in your scenarios. The "id" attribute is an integer where the maximum value is 19. See conditional branching section for more info. | Example: set label number 13:<label id="13"/> |
| <Response Time Repartition> | value | Specify the intervals, in milliseconds, used to distribute the values of response times. | <ResponseTimeRepartition value="10, 20, 30"/>: response time values are distributed between 0 and 10ms, 10 and 20ms, 20 and 30ms, 30 and beyond. |
| <Call Length Repartition> | value | Specify the intervals, in milliseconds, used to distribute the values of the call length measures. | <CallLengthRepartition value="10, 20, 30"/>: call length values are distributed between 0 and 10ms, 10 and 20ms, 20 and 30ms, 30 and beyond. |
| <sync> | action | As most scenarios have a preparation step (user reservation) that is not considered part of the actual scenario exercised and as this actual scenario must start at the time given by the statistical distribution of scenario attempts, scenario files (at least the initiating side) must contain a synchronization point where SIPp will wait until the time the actual scenario attempt must start. |
<sync crlf="true">
 <action>
  <exec int_cmd="set_start_time"/>
 </action>
</sync>
Note that the manager configuration can disable this synchronization for some parts of the runs, for example in a step performing the pre-registration of users. |
| <sendRmt> | type | The command sends a (non-SIP) message to the partner SIPp instance. In case no partner has been assigned yet to the scenario, a partner SIPp instance is selected at random (uniform) before sending the message. |
<sendRmt type="req_user"> <param name="scenario" value="ims_uas"/> <param name="from_uri" value="[field0]@[field1]"/> <param name="call_id" value="[call_id]"/> </sendRmt> |
| <recvRmt> | type |
The command waits for a message of the specified type to be received from the
partner SIPp instance. Additionally, it can also be the first command of a receiving side scenario
(e.g. the called party), in which case it must specify the req_user
message type. |
<recvRmt type="req_user"> <action> <assign_user pool="2"/> <move_user pool="3"/> </recvRmt> |
| timeout | Max time to wait for the message from partner (not valid for a <recvRmt> as first command in a scenario). |
<recvRmt type="res_user" timeout="8000"> <action> <store_param param="user_name" assign_to="1"/> </action> </recvRmt> |
Partner Message Types (sendRmt and recvRmt)
| req_user | Requests user reservation. |
| res_user | Result of user resevation. |
| res_call_info | Typically sent at the end of a scenario, carries call information like RTDs and timestamps measured at the partner SIPp (the approach is that all timing measurements are gathered at one side of a scenario and dumped by that side - hence they need to be sent from the partner in case they were measured there, or in case the measurement is between events at different sides). |
There are not so many commands: send, recv, sendRmt, recvRmt, pause, ResponseTimeRepartition and CallLengthRepartition. To make things even clearer, nothing is better than an example...
Structure of client (UAC like) XML scenarios
A client scenario is a scenario that starts with a "send" command. So let's start:
<scenario name="Basic Sipstone UAC">
  <send>
    <![CDATA[

      INVITE sip:[service]@[remote_ip]:[remote_port] SIP/2.0
      Via: SIP/2.0/[transport] [local_ip]:[local_port]
      From: sipp <sip:sipp@[local_ip]:[local_port]>;tag=[call_number]
      To: sut <sip:[service]@[remote_ip]:[remote_port]>
      Call-ID: [call_id]
      Cseq: 1 INVITE
      Contact: sip:sipp@[local_ip]:[local_port]
      Max-Forwards: 70
      Subject: Performance Test
      Content-Type: application/sdp
      Content-Length: [len]

      v=0
      o=user1 53655765 2353687637 IN IP[local_ip_type] [local_ip]
      s=-
      t=0 0
      c=IN IP[media_ip_type] [media_ip]
      m=audio [media_port] RTP/AVP 0
      a=rtpmap:0 PCMU/8000


    ]]>
  </send>
Inside the "send" command, you have to enclose your SIP message between the "<![CDATA" and the "]]>" tags. Everything between those tags is going to be sent toward the remote system. You may have noticed that there are strange keywords in the SIP message, like [service], [remote_ip], .... Those keywords are used to indicate to SIPp that it has to do something with it.
Here is the list:
Keyword list
| Keyword | Default | Description |
|---|---|---|
| [service] | service | Service field, as passed in the -s service_name |
| [remote_ip] | - | Remote IP address, as passed on the command line. |
| [remote_port] | 5060 | Remote IP port, as passed on the command line. You can add a computed offset [remote_port+3] to this value. |
| [transport] | UDP | Depending on the value of -t parameter, this will take the values "UDP" or "TCP". |
| [local_ip] | Primary host IP address | Will take the value of -i parameter. |
| [local_ip_type] | - | Depending on the address type of -i parameter (IPv4 or IPv6), local_ip_type will have value "4" for IPv4 and "6" for IPv6. |
| [local_port] | Random | Will take the value of -p parameter. You can add a computed offset [local_port+3] to this value. |
| [len] | - | Computed length of the SIP body. To be used in "Content-Length" header. You can add a computed offset [len+3] to this value. |
| [call_number] | - | Index. The call_number starts from "1" and is incremented by 1 for each call. |
| [cseq] | - | Generates automatically the CSeq number. The initial value is 1 by default. It can be changed by using the -base_cseq command line option. |
| [call_id] | - | A call_id identifies a call and is generated by SIPp for each new call. In client mode, it is mandatory
to use the value generated by SIPp in the "Call-ID" header. Otherwise, SIPp will not recognise
the answer to the message sent as being part of an existing call. Note: [call_id] can be pre-pended with an arbitrary string using '///'. Example: Call-ID: ABCDEFGHIJ///[call_id] - it will still be recognized by SIPp as part of the same call. |
| [media_ip] | - | Depending on the value of -mi parameter, it is the local IP address for RTP echo. |
| [media_ip_type] | - | Depending on the address type of -mi parameter (IPv4 or IPv6), media_ip_type will have value "4" for IPv4 and "6" for IPv6. Useful to build the SDP independently of the media IP type. |
| [media_port] | - | Depending on the value of -mp parameter, it set the local RTP echo port number. Default is none. RTP/UDP packets received on that port are echoed to their sender. You can add a computed offset [media_port+3] to this value. |
| [auto_media_port] | - | Only for pcap. To make audio and video ports begin from the value of -mp parameter, and change for each call using a periodical system, modulo 10000 (which limits to 10000 concurrent RTP sessions for pcap_play) |
| [last_*] | - | The '[last_*]' keyword is replaced automatically by the specified header if it was present in the last message received (except if it was a retransmission). If the header was not present or if no message has been received, the '[last_*]' keyword is discarded, and all bytes until the end of the line are also discarded. If the specified header was present several times in the message, all occurrences are concatenated (CRLF separated) to be used in place of the '[last_*]' keyword. |
| [field0-n] | - | Used to inject values from an external CSV file or from static user data if a user is assigned to the call. See "Injecting values from an external CSV during calls" section. |
| [$n] | - | Used to inject the value of call variable number n. See "Actions" section |
| [authentication] | - | Used to put the authentication header. This field can have parameters, in the following form: [authentication username=myusername password=mypassword]. If no username is provided, the value from -s command line parameter (service) is used. If no password is provided, the value from -ap command line parameter is used. See "Authentication" section |
| [pid] | - | Provide the process ID (pid) of the main SIPp thread. |
| [routes] | - | If the "rrs" attribute in a recv command is set to "true", then the "Record-Route:" header of the message received is stored and can be recalled using the [routes] keyword |
| [next_url] | - | If the "rrs" attribute in a recv command is set to "true", then the [next_url] contains the contents of the Contact header (i.e within the '<' and '>' of Contact) |
| [branch] | - | Provide a branch value which is a concatenation of magic cookie (z9hG4bK) + call number + message index in scenario. |
| [msg_index] | - | Provide the message number in the scenario. |
| [cseq] | - | Provides the CSeq value of the last request received. This value can be incremented (e.g. [cseq+1] adds 1 to the CSeq value of the last request). |
| [%<param>] | - |
Example: <pause poisson="true" mean="%RingTime"/> |
Now that the INVITE message is sent, SIPp can wait for an answer by using the "recv" command.
  <recv response="100"> optional="true"
  </recv>

  <recv response="180"> optional="true"
  </recv>

  <recv response="200">
  </recv>
100 and 180 messages are optional, and 200 is mandatory. In a "recv" sequence, there must be one mandatory message.
Now, let's send the ACK:
  <send>
    <![CDATA[

      ACK sip:[service]@[remote_ip]:[remote_port] SIP/2.0
      Via: SIP/2.0/[transport] [local_ip]:[local_port]
      From: sipp <sip:sipp@[local_ip]:[local_port]>;tag=[call_number]
      To: sut <sip:[service]@[remote_ip]:[remote_port]>[peer_tag_param]
      Call-ID: [call_id]
      Cseq: 1 ACK
      Contact: sip:sipp@[local_ip]:[local_port]
      Max-Forwards: 70
      Subject: Performance Test
      Content-Length: 0

    ]]>
  </send>
We can also insert a pause. The scenario will wait for 5 seconds at this point.
<pause milliseconds="5000"/>
And finish the call by sending a BYE and expecting the 200 OK:
    <send retrans="500">
     <![CDATA[

      BYE sip:[service]@[remote_ip]:[remote_port] SIP/2.0
      Via: SIP/2.0/[transport] [local_ip]:[local_port]
      From: sipp  <sip:sipp@[local_ip]:[local_port]>;tag=[call_number]
      To: sut  <sip:[service]@[remote_ip]:[remote_port]>[peer_tag_param]
      Call-ID: [call_id]
      Cseq: 2 BYE
      Contact: sip:sipp@[local_ip]:[local_port]
      Max-Forwards: 70
      Subject: Performance Test
      Content-Length: 0

    ]]>
   </send>

   <recv response="200">
   </recv>
And this is the end of the scenario:
</scenario>
Creating your own SIPp scenarios is not a big deal. If you want to see other examples, use the -sd parameter on the command line to display embedded scenarios.
Structure of server (UAS like) XML scenarios
A server scenario is a scenario that starts with a "recv" command. The syntax and the list of available commands is the same as for "client" scenarios.
But you are more likely to use [last_*] keywords in those server side scenarios. For example, a UAS example will look like:
  <recv request="INVITE">
  </recv>

  <send>
    <![CDATA[

      SIP/2.0 180 Ringing
      [last_Via:]
      [last_From:]
      [last_To:];tag=[call_number]
      [last_Call-ID:]
      [last_CSeq:]
      Contact: <sip:[local_ip]:[local_port];transport=[transport]>
      Content-Length: 0

    ]]>
  </send>
The answering message, 180 Ringing in this case, is built with the content of headers received in the INVITE message.
Actions
In a "recv" or "recvCmd" command, you have the possibility to execute an action. Several actions are available:
- Regular expressions (ereg)
- Log something in aa log file (log)
- Execute an external (system), internal (int_cmd) or pcap_play_audio/pcap_play_video command (exec)
- User-related Actions (assign_user, move_user)
- RTD-related Actions (rtd_eval, rtd_store, rtd_op)
Regular expressions
Using regular expressions in SIPp allows to
- Extract content of a SIP message or a SIP header and store it for future usage (called re-injection)
- Check that a part of a SIP message or of a header is matching an expected expression
Regular expressions used in SIPp are defined per Posix Extended standard (POSIX 1003.2). If you want to learn how to write regular expressions, I will recommend this regexp tutorial.
Here is the syntax of the regexp action:
regexp action syntax
| Keyword | Default | Description |
|---|---|---|
| regexp | None | Contains the regexp to use for matching the received message or header. MANDATORY. |
| search_in | msg | can have 2 values: "msg" (try to match against the entire message) or "hdr" (try to match against a specific SIP header). |
| header | None | Header to try to match against. Only used when the search_in tag is set to hdr. MANDATORY IF search_in is equal to hdr. |
| case_indep | false | To look for a header ignoring case . Only used when the search_in tag is set to hdr. |
| occurence | 1 | To find the nth occurrence of a header. Only used when the search_in tag is set to hdr. |
| start_line | false | To look only at start of line. Only used when the search_in tag is set to hdr. |
| check_it | false | if set to true, the call is marked as failed if the regexp doesn't match. |
| assign_to | None | contains the variable id (integer) or a list of
variable id which will be used to store the
result(s) of the matching process between the regexp
and the message. Those variables can be re-used at
a later time either by using '[$n]' in the scenario
to inject the value of the variable in the messages or
by using the content of the variables for conditional
branching.
The first variable in the variable list of assign_to contains the entire regular expression matching. The following variables contain the sub-expressions matching. Example: <ereg regexp="o=([[:alnum:]]*) ([[:alnum:]]*) ([[:alnum:]]*)"
search_in="msg"
check_it=i"true"
assign_to="3,u3,u2,8"/>
If the SIP message contains the line
o=user1 53655765 2353687637 IN IP4 127.0.0.1call variable 3 will contain "o=user1 53655765 2353687637", user variable 3 will contain "user1", user variable 2 will contain "53655765" and call variable 8 will contain "2353687637". |
Note that you can have several regular expressions in one action.
The following example is used to:
- First action:
- Extract the first IPv4 address of the received SIP message
- Check that we could actually extract this IP address (otherwise call will be marked as failed)
- Assign the extracted IP address to call variables 1 and 2.
- Second action:
- Extract the Contact: header of the received SIP message
- Assign the extracted Contract: header to variable 6.
<recv response="200" start_rtd="true">
  <action>
    <ereg regexp="([0-9]{1,3}\.){3}[0-9]{1,3}:[0-9]*" search_in="msg" check_it="true" assign_to="1,2" />
    <ereg regexp=".*" search_in="hdr" header="Contact:" check_it="true" assign_to="6" />
  </action>
</recv>
Log a message
The "log" action allows you to customize your traces. Messages are printed in the <scenario file name>_<pid>_logs.log file. Any keyword is expanded to reflect the value actually used.
Example:
   <recv request="INVITE" crlf="true" rrs="true">
     <action>
	 <ereg regexp=".*" search_in="hdr" header="Some-New-Header:" assign_to="1" />
          <log message="From is [last_From]. Custom header is [$1]"/>
     </action>
   </recv>
Execute a command
The "exec" action allows you to execute "internal", "external", "play_pcap_audio" or "play_pcap_video" commands.
Internal commands
Internal commands (specified using int_cmd attribute) are:
| Keyword | Description | Example |
|---|---|---|
| stop_call
stop_gracefully |
Similar to pressing 'q' |
<exec int_cmd="stop_call"/> |
| stop_now | Similar to pressing ctrl+C |
<exec int_cmd="stop_now"/> |
| set_start_time | Resets the time reference for the current call. This is used so as to ignore the user reservation procedure portion of a scenario, as it is not actually part of the SIP scenario being performed. This action should therefore be performed at the point in the scenario file where the actual SIP scenario really starts. |
<exec int_cmd="set_start_time"/> |
| set_target_ip | Forces the target IP to the one of the partner SIPp (To be used in "loop-back" configuration, SIPp against SIPp without any SUT in between). |
<exec int_cmd="set_target_ip"/> |
Example that stops the execution of the script on receiving a 603 response:
   <recv response="603" optional="true">
     <action>
          <exec int_cmd="stop_now"/>
      </action>
   </recv>
External commands
External commands (specified using command attribute) are anything that can be executed on local host with a shell.
Example that execute a system echo for every INVITE received:
   <recv request="INVITE">
     <action>
          <exec command="echo [last_From] is the from header received >> from_list.log"/>
      </action>
   </recv>
PCAP (media) commands
User related Actions
| Keyword | Description | Example |
|---|---|---|
| assign_user | Picks a user at random from a specified user pool and assigns the user to
the scenario instance (the call).
Once a user is assigned to the call, user variables can be used to store and retrieve data and the [fieldn] injection fields refer to the user static data as loaded from the user data file (-user_inf command line parameter) Attributes:
|
<assign_user pool="0" scheme="rand_uni"/> |
| move_user | Moves the user currently assigned to the call into a specified user pool.
Attributes:
|
<move_user pool="4"/> |
RTD-related Actions
The actions listed in this section allow performing operations on RTDs (Response Time Duration - i.e. SIPp scenario timers). In order for IMS Bench SIPp to provide a scalable test system possibly consisting of multiple SIPp instances distributed over multiple physical systems, and also because of the need to measure time between an event happening in the client-side scenario and another event happening at its partner server-side scenario (for example the time for the INVITE to get from the UAC, through the SUT, to the UAS), IMS Bench SIPp provides a mechanism, based on actions, to compute RTDs based on timestamps from the local and the partner SIPp scenarios. In addition, actions also allow computing RTDs are the sum of or difference between two other (local or remote) RTDs. This can be useful to compute the time metric of a complete call setup but excluding the ring time (as the latter is user dependent and does not relfect responsiveness of the SUT).
In the RTD actions listed below, whenever a remote rtd can be used as argument, the action must be included in a <recvRmt> command that receives a message from the parnter SIPp with the necessary RTD value. Otherwise, this will cause a failure of the test run.
These actions support a timeout attribute which is then used as a maximum allowed value for the rtd value that the action computes. In case the maximum is exceeded, the scenario is aborted (while executing the action). Therefore, the Time Metrics feature should usually be used instead of the timeout argument unless checking for protocol timeouts.
| Action | Description | Example |
|---|---|---|
| rtd_eval | Computes an RTD from 2 timestamps. Usually, at least one of
them has been received from the partner SIPp.
Attributes:
After the action is executed, the target local rtd contains (stop - start). |
<recvRmt type="res_call_info" timeout="8000">
  <action>
    <rtd_eval rtd="2" start="2" stop="r2"/>
  </action>
</recvRmt>
This will look in the message received from the partner for a parameter giving the start time (timestamp) of RTD 2 and use that to compute the local RTD 2 as the difference between the local and remote RTD 2 start times (used as timestamps). |
| rtd_op | Performs a simple computation (add or sub) on 2 RTDs. Each RTD argument
can be local or remote. The operation is performed on the values of the
specified RTDs (not on start_times/timestamps, only on already measured
durations).
Attributes:
|
<action>
  <rtd_op op="sub" rtd="1" rtd1="1" rtd2="5"/>
</action>
Substracts RTD5 from RTD1 (both local) and stores the result into RTD 1. |
| rtd_store | Simply stores an RTD received from the partner into a local RTD for later
computation or as final scenario metric value.
Attributes:
|
<recvRmt type="res_call_info" timeout="8000">
  <action>
    <rtd_store rtd="3" rmt_rtd="5"/>
  </action>
</recvRmt>
Stores the value of the remote RTD5 as received in the message from the partner SIPp into local RTD3. |
Injecting values from an external CSV during calls
When the -user_inf command line parameter is used to specify a user data file, corresponding user entities are created within SIPp and are each assigned a different IP and port combination. Data from the specified file is also loaded into user specific data fields which can then be used within the scenarios.
Similar to what happens in the standard SIPp case, the [fieldn] keyword is replaced, in outgoing messages, by the n-th user data field of the user currently associated with the call. This requires that a user has previously been associated with the call by means of a <assign_user> action.
The user data file has the following format:
- Each line defines one user and is made up of semi-colon (';') delimited columns.
- The first column represents the ID of the user pool that the user will initially be placed in.
- Subsequent columns hold the static user data fields that scenarios can refer to using the [fieldn] keyword.
Example:
0;subs000000;ims.test;usim000000;sp1.ims.test;pass000000;data0_1
0;subs000001;ims.test;usim000001;sp1.ims.test;pass000001;data1_1
0;subs000002;ims.test;usim000002;sp1.ims.test;pass000002;data2_1
0;subs000003;ims.test;usim000003;sp1.ims.test;pass000003;data3_1
0;subs000004;ims.test;usim000004;sp1.ims.test;pass000004;data4_1
...
In this example, all users are initially in pool 0 (for example, the pool of not registered users). The meaning of the remaining fields depends of what the scenario files do with them but in case of the provided IMS Benchmark scenarios, the user data fields have the following meaning:
- username part of the public identity of the user
- domain part of the public identity of the user
- authentication username
- authentication realm
- authentication password (AKA Key value)
- example extra data - not used
Conditional branching
Conditional branching in scenarios
It is possible to execute a scenario in a non-linear way. You can jump from one part of the scenario to another for example when a message is received or if a call variable is set.
You define a label (in the xml) as <label id="n"/> Where n is a number between 1 and 19 (we can easily have more if needed). The label commands go anywhere in the main scenario between other commands. To any action command (send, receive, pause, etc.) you add a next="n" parameter, where n matches the id of a label. When it has done the command it continues the scenario from that label. This part is useful with optional receives like 403 messages, because it allows you to go to a different bit of script to reply to it and then rejoin at the BYE (or wherever or not).
Alternatively, if you add a test="m" parameter to the next, it goes to the label only if variable [$m] is set. This allows you to look for some string in a received packet and alter the flow either on that or a later part of the script.
Example:
The following example corresponds to the embedded 'branchc' (client side) scenario.
It has to run against the embedded 'branchs' (server side) scenario.
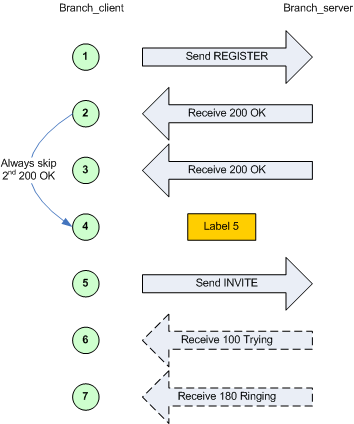
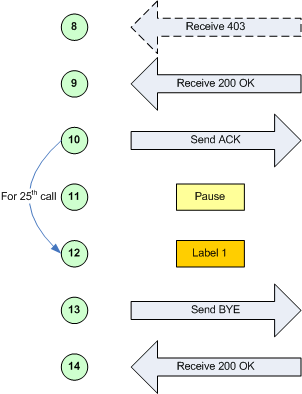
Randomness in conditional branching
To have SIPp behave somewhat more like a "normal" SIP client being used by a human, it is possible to use "statistical branching". Wherever you can have a conditional branch on a variable being set (test="4"), you can also branch based on a statistical decision using the attribute "chance" (e.g. chance="0.90"). Chance can have a value between 0 (never) and 1 (always). "test" and "chance" can be combined, i.e. only branching when the test succeeds and the chance is good.
With this, you can have a variable reaction in a given scenario (e.g.. answer the call or reject with busy), or run around in a loop (e.g. registrations) and break out of it after some random number of iterations.
SIP Authentication
Two authentication algorithms are supported: Digest/MD5 ("algorithm="MD5"") and Digest/AKA ("algorithm="AKAv1-MD5"", as specified by 3GPP for IMS).
Note: IMS Bench SIPp has authentication support enabled by default at compile time (requiring OpenSSL libs as described in the installation section).
Doing authentication in scenarios is simple: When receiving a 401 (Unauthorized) or a 407 (Proxy Authentication Required), you must add auth="true" in the <recv> command to take the challenge into account in order to compute a response in a next message.
This is for example used, in the IMS Bench, to include an authenticatom
response in the first REGISTER message of a re-registration, as an attempt
to speed up the re-registration process in case the SUT still accepts a
response to an earlier challenge (Note: This is probably not correct and
might not work against real IMS cores - the re-registration scenario is
in need of some rework).
Computing the authorization header is done through the usage of the [authentication] keyword. Depending on the algorithm ("MD5" or "AKAv1-MD5"), different parameters must be passed next to the authentication keyword:
- Digest/MD5 (example: [authentication username=joe password=schmo])
- username: username: if no username is specified, the username is taken from the '-s' (service) command line parameter
- password: password: if no password is specified, the password is taken from the '-ap' (authentication password) command line parameter
- Digest/AKA: (example: [authentication username=HappyFeet aka_OP=0xCDC202D5123E20F62B6D676AC72CB318 aka_K=0x465B5CE8B199B49FAA5F0A2EE238A6BC aka_AMF=0xB9B9])
- username: username: if no username is specified, the username is taken from the '-s' (service) command line parameter
- aka_K (or password): Permanent secret key. If no aka_K is provided, the "password" attributed is used as aka_K.
- aka_OP: OPerator variant key
- aka_AMF: Authentication Management Field (indicates the algorithm and key in use)
In case you want to use authentication with a different username/password or aka_K
for each call,
Example:
  <recv response="401" auth="true" auth_assign_to="u2" rtd="1">
  </recv>

  <send retrans="500" start_rtd="2">
    <![CDATA[
      REGISTER sip:[field1] SIP/2.0
      Via: SIP/2.0/[transport] [local_ip]:[local_port];branch=[branch]
      From: "[field0]" <sip:[field0]@[field1]>;tag=[call_number]
      To: "[field0]" <sip:[field0]@[field1]>
      Call-ID: [call_id]
      CSeq: 2 REGISTER
      Contact: <sip:[field0]@[local_ip]:[local_port]>;expires=[%RegistrationExpire]
      Expires: [%RegistrationExpire]
      Content-Length: 0
      [authentication username=[field2]@[field3] password=[field4]]
      Supported: path
    ]]>
  </send>
If you later (for example in another scenario) want to generate an authentication response based on the challenge that was stored in user variable u2 by the previous example, the following authentication line, using the challenge_from and challenge_type attributes would do it:
[authentication username=[field2]@[field3] password=[field4] challenge_from="u2" challenge_type=401]
Various Topics
SIPp Transport Modes
From the transport modes supported by the standard SIPp, only UDP transport is currently supported by IMS Bench SIPp. It however adds a few options in the way UDP is used, making it more closely resemble a set of separate client devices.
UDP one socket per user
In UDP "one socket per user" mode, each user that a SIPp instance represents corresponds to a separate UDP port that SIPp uses for the traffic belonging to that user.
All users however share a single IP address.
UDP multiple IP addresses
In UDP multiple IP addresses mode, SIPp distributes the users it represents among a set of configured IP addresses. In case there are more users than IP addresses, different UDP ports are used for users that share the same IP address, thereby giving a unique IP adddress / UDP port combination to each user.
Running SIPp in background
SIPp can be launched in background mode (-bg command line option).
By doing so, SIPp will be detached from the current terminal and run in the background. The PID of the SIPp process is provided on standard output at startup (can be useful when you run multiple instances!). If you are not controlling SIPp through the IMS Bench SIPp manager and if you didn't specify a number of calls to execute with the -m option, SIPp will run forever.
There is a mechanism implemented to stop SIPp smoothly. The command kill -SIGUSR1 [SIPp_PID] will instruct SIPp to stop placing any new calls and finish all ongoing calls before exiting.
Handling Media with SIPp
Media plane features have not been tested with IMS Bench SIPp and are therefore likely to be broken. The corresponding code has however not been removed.
SIPp Exit codes
To ease automation of testing, upon exit (on fatal error or when the number of asked calls (-m command line option) is reached, sipp exits with one of the following exit codes:
- 0: All calls were successful
- 1: At least one call failed
- 97: exit on internal command. Calls may have been processed
- 99: Normal exit without calls processed
- -1: Fatal error
Depending on the system that SIPp is running on, you can echo this exit code by using "echo ?" command.
Statistics
Response times
Response times (or more generally time between two scenario events) can be gathered and reported. SIPp has 5 timers (the number is set at compile time) used to compute time between two SIPp commands (send, recv or nop). You can start a timer by using the start_rtd attribute and stop it using the rtd attribute.
You can view the value of those timers in the SIPp interface by pressing 3, 6, 7, 8 or 9. You can also save the values in a CSV file using the -trace_stat option (see below).
As most IMS Bench scenarios require measuring several delays, the start_rtd and rtd attributes have been extended to support a list of timers to start or stop at once. This allows, for example, measuring delays between the same starting point and different end points, or vice-versa. See start_rtd attribute for an example.
IMS Bench SIPp adds the possibility to check at run-time that
the value of a specific timer remains within an allowed range and,
in case it exceeds its maximum allowed value, to flag the call as
inadequately handled even though it was successful from a protocol
point of view.
This is then reflected in the statistics, and in the scenario result
CSV file if the -trace_scen command line option is
used. In a complete IMS Bench SIPp setup, this also impacts the
percentage of inadequately handled scenario attempts as determined
by the manager when deciding whether to do the next step of the load
profile or not.
In IMS Bench SIPp, the timers that must be dumped into the
scenario CSV result file, and for whch such a maximum value can be
defined are called a "metrics".
See Time Metrics to learn more
about this feature and the associated syntax.
IMS Bench SIPp being a scalable test system that attempts to mimic real users connecting to the SUT, it can orchestrate scenario execution between two SIPp instances possibly running on different physical systems. New actions were added to allow computation on timer values (RTDs), including computing an RTD as a difference between two timestamps, one local, the other from the remote (partner) SIPp instance.
Available counters
The -trace_stat option dumps all statistics in the scenario_name_pid.csv file. The dump starts with one header line with all counters. All following lines are 'snapshots' of statistics counter given the statistics report frequency (-fd option). When SIPp exits, the last values of the statistics are also dumped in this file.
This file can be easily imported in any spreadsheet application, like Excel.
In counter names, (P) means 'Periodic' - since last statistic row and (C) means 'Cumulated' - since sipp was started.
Available statistics are:
- StartTime: Date and time when the test has started.
- LastResetTime: Date and time when periodic counters where last reseted.
- CurrentTime: Date and time of the statistic row.
- ElapsedTime: Elapsed time.
- CallRate: Call rate (calls per seconds).
- IncomingCall: Number of incoming calls.
- OutgoingCall: Number of outgoing calls.
- TotalCallCreated: Number of calls created.
- CurrentCall: Number of calls currently ongoing.
- SuccessfulCall: Number of successful calls.
- FailedCall: Number of failed calls (all reasons).
- FailedCannotSendMessage: Number of failed calls because Sipp cannot send the message (transport issue).
- FailedMaxUDPRetrans: Number of failed calls because the maximum number of UDP retransmission attempts has been reached.
- FailedUnexpectedMessage: Number of failed calls because the SIP message received is not expected in the scenario.
- FailedCallRejected: Number of failed calls because of Sipp internal error. (a scenario sync command is not recognized or a scenario action failed or a scenario variable assignment failed).
- FailedCmdNotSent: Number of failed calls because of inter-Sipp communication error (a scenario sync command failed to be sent).
- FailedRegexpDoesntMatch: Number of failed calls because of regexp that doesn't match (there might be several regexp that don't match during the call but the counter is increased only by one).
- FailedRegexpHdrNotFound: Number of failed calls because of regexp with hdr option but no matching header found.
- OutOfCallMsgs: Number of SIP messages received that cannot be associated with an existing call.
- AutoAnswered: Number of unexpected specific messages received for new Call-ID. The message has been automatically answered by a 200 OK Currently, implemented for 'PING' message only.
- Retransmissions:
not documented Number of UDP retransmission. - Retransmissions2:
NEW Stat collected at the server side are added to the client side. - FailedTimeoutInRtdOp:
NEW Number of calls that exceed the defined metrics or for which the timeout specified in an rtd evaluation action was exceeded.
In addition, two other statistics are gathered:
- ResponseTime (see previous section)
- CallLength: this is the time of the duration of an entire call.
Both ResponseTime and CallLength statistics can be tuned using ResponseTimeRepartition and CallLengthRepartition commands in the scenario.
Error handling
SIPp has advanced features to handle errors and unexpected events. They are detailed in the following sections.
Unexpected messages
- When a SIP message that can be correlated to an existing call (with the Call-ID: header) but is not expected in the scenario is received, SIPp will send a CANCEL message if no 200 OK message has been received or a BYE message if a 200 OK message has been received. The call will be marked as failed. If the unexpected message is a 4XX or 5XX, SIPp will send an ACK to this message, close the call and mark the call as failed.
- When a SIP message that can't be correlated to an existing call (with the Call-ID: header) is received, SIPp will send a BYE message. The call will not be counted at all.
- When a SIP "PING" message is received, SIPp will send an ACK message in response. This message is not counted as being an unexpected message. But it is counted in the "AutoAnswered" statistic counter.
- An unexpected message that is not a SIP message will be simply dropped.
Retransmissions (UDP only)
A retransmission mechanism exists in UDP transport mode. To activate the retransmission mechanism, the "send" command must include the "retrans" attribute.
When it is activated and a SIP message is sent and no ACK or response is received in answer to this message, the message is re-sent.
<send retrans="500">: will initiate the T1 timer to 500 milliseconds.
Even if retrans is specified in your scenarios, you can override this by using the -nr command line option to globally disable the retransmission mechanism.
Log files (error + log + screen)
There are several ways to trace what is going on during your SIPp runs.
- You can log sent and received SIP messages in <name_of_the_scenario>_<pid>_messages.log by using the command line parameter -trace_msg. The messages are time-stamped so that you can track them back.
- You can trace all unexpected messages or events in <name_of_the_scenario>_<pid>_errors.log by using the command line parameter -trace_err.
- You can save in a file the statistics screens, as displayed in
the interface. This is especially useful when running SIPp in background
mode.
This can be done in two ways:- When SIPp exits to get a final status report (-trace_screen option)
- On demand by using USR2 signal (example: kill -SIGUSR2 738)
- You can log all call ids for calls that timeout (the maximum number of retransmissions for UDP transport is reached) by using the command line parameter -trace_timeout
Online help (-h)
The online help, available through the -h option is duplicated here for your convenience
Usage:

  sipp remote_host[:remote_port] [options]

  Available options:
| -aa | Enable automatic 200 OK answer for INFO, UPDATE and NOTIFY messages. |
| -ap password | Set the password for authentication challenges. Default is 'password' |
| -auth_uri | Force the value of the URI for authentication. By default, the URI is composed of remote_ip:remote_port. |
| -base_cseq n | Start value of [cseq] for each call. |
| -bg | Launch SIPp in background mode. |
| -bind_local | Bind socket to local IP address, i.e. the local IP address is used as the source IP address. If SIPp runs in server mode it will only listen on the local IP address instead of all IP addresses. |
| -buff_size buff_size | Set the send and receive buffer size. |
| -cid_str string | Call ID string (default %u-%p@%s). %u=call_number, %s=ip_address, %p=process_number,%%=% (in any order). |
| -d duration | Controls the length (in milliseconds) of calls. More precisely, this controls
the duration of 'pause' instructions in the scenario, if they do not have a
'milliseconds' section. Default value is 0. |
| -f frequency | Set the statistics report frequency on screen (in seconds). Default is 1. |
| -fd frequency | Set the statistics dump log report frequency (in seconds). Default is 60. |
| -groupid id | SIPp group ID to define SIPp pools (see -rmctrl) |
| -i local_ip | Set the local IP address for 'Contact:', 'Via:', and 'From:' headers. Default is primary host IP address. |
| -id | SIPp Test system ID to communicate to the manager (see -rmctrl) |
| -inf file_name | Inject values from an external CSV file during calls into the scenarios.
First line of this file say whether the data is to be read in sequence (SEQUENTIAL) or random
(RANDOM) order. Each line corresponds to one call and has one or more ';' delimited data fields. Those fields can be referred as [field0], [field1], ... in the xml scenario file. |
| -ip_field nr | Set which field from the injection file contains the IP address from which the client will send its messages. If this option is omitted and the '-t ui' option is present, then field 0 is assumed. Use this option together with '-t ui' |
| -key keyword value | Set the generic parameter named "keyword" to "value". |
| -l calls_limit | Set the maximum number of simultaneous calls. Once this limit is reached, traffic
is decreased until the number of open calls goes down. Default: (3 * call_duration (s) * rate). |
| -lost | Set the number of packets to lose by default (scenario specifications override this value). |
| -m calls | Stop the test and exit when 'calls' calls are processed. |
| -master | 3pcc extended mode: indicates the name of the twin sipp instance (if master) |
| -max_invite_retrans | Maximum number of UDP retransmissions for invite transactions before call ends on timeout. |
| -max_non_invite_retrans | Maximum number of UDP retransmissions for non-invite transactions before call ends on timeout. |
| -max_reconnect | Set the the maximum number of reconnection. |
| -max_recv_loops | Set the maximum number of messages received read per cycle. Increase this value for high traffic level. The default value is 1000. |
| -max_retrans | Maximum number of UDP retransmissions before call ends on timeout. Default is 5 for INVITE transactions and 7 for others. |
| -max_socket max | Set the max number of sockets to open simultaneously. This option is significant if you use one socket per call. Once this limit is reached, traffic is distributed over the sockets already opened. Default value is 50000. |
| -mb buf_size | Set the RTP echo buffer size (default: 2048). |
| -mi local_rtp_ip | Set the local media IP address. |
| -mp media_port | Set the local RTP echo port number. Default is 6000. |
| -nd | No Default. Disable all default behavior of SIPp which are the following: - On UDP retransmission timeout, abort the call by sending a BYE or a CANCEL - On receive timeout with no ontimeout attribute, abort the call by sending a BYE or a CANCEL - On unexpected BYE send a 200 OK and close the call - On unexpected CANCEL send a 200 OK and close the call - On unexpected PING send a 200 OK and continue the call - On any other unexpected message, abort the call by sending a BYE or a CANCEL |
| -nr | Disable retransmission in UDP mode. |
| -p local_port | Set the local port number. Default is a random free port chosen by the system. |
| -pause_msg_ign | Ignore the messages received during a pause defined in the scenario |
| -r rate (cps) | Set the call rate (in calls per seconds). This value can be changed during test by pressing
|
| -rate_increase | Specify the rate increase every -fd seconds This allows you to increase the load for each independent logging period Example: -rate_increase 10 -fd 10 ==> increase calls by 10 every 10 seconds. |
| -rate_max | If -rate_increase is set, then quit after the rate reaches this value. Example: -rate_increase 10 -max_rate 100 ==> increase calls by 10 until 100 cps is hit. |
| -reconnect_close true/false | Should calls be closed on reconnect? |
| -reconnect_sleep int | How long to sleep between the close and reconnect? |
| -recv_timeout nb | Global receive timeout in milliseconds. If the expected message is not received, the call times out and is aborted |
| -rmctrl ip[:port] | IP of the Master Remote Control |
| -rp period (ms) | Specify the rate period in milliseconds for the call rate. Default is 1 second. This allows you to have n calls every m milliseconds (by using -r n -rp m). Example: -r 7 -rp 2000 ==> 7 calls every 2 seconds. -r 10 -rp 5s => 10 calls every 5 seconds. |
| -rsa host[:port] | Set the remote sending address to host:port. for sending the messages. |
| -rtp_echo | Enable RTP echo. RTP/UDP packets received on port defined by -mp are echoed to their sender. RTP/UDP packets coming on this port + 2 are also echoed to their sender (used for sound and video echo). |
| -rtt_freq freq | freq is mandatory. Dump response times
every freq calls in the log file defined by -trace_rtt. Default value is 200. |
| -s service_name | Set the username part of the resquest URI. Default is 'service'. |
| -scen_freq | freq is mandatory. Dump scenario stats every freq calls
in the log file (see -trace_scen). Default value is 200. |
| -sd name | Dumps a default scenario (embeded in the sipp executable) |
| -sf filename | Loads an alternate xml scenario file. To learn more about XML scenario syntax, use the -sd option to dump embedded scenarios. They contain all the necessary help. |
| -slave | 3pcc extended mode: indicates the name of the twin sipp instance (if slave) |
| -slave_cfg | 3pcc extended mode: indicates the file where the master and slave addresses are stored. This option must be set in the command line before the -sf option |
| -sn name | Use a default scenario (embedded in the sipp executable). If this option is omitted, the Standard SipStone UAC scenario is loaded. Available values in this version:
|
| -stat_delimiter string | Set the delimiter for the statistics file |
| -stf file_name | Set the file name to use to dump statistics |
| -t [u1|un|ui|t1|tn|l1|ln] | Set the transport mode:
|
| -tdmmap map | Generate and handle a table of TDM circuits. A circuit must be available for the call to be placed. Format: -tdmmap {0-3}{99}{5-8}{1-31} |
| -timeout nb | Global timeout in seconds. If this option is set, SIPp quits after nb seconds |
| -timer_resol | Set the timer resolution in milliseconds. This option has an impact on timers precision. Small values allow more precise scheduling but impacts CPU usage. If the compression is on, the value is set to 50ms. The default value is 10ms. |
| -tls_cert name | Set the name for TLS Certificate file. Default is 'cacert.pem' |
| -tls_crl name | Set the name for Certificate Revocation List file. If not specified, X509 CRL is not activated. |
| -tls_key name | Set the name for TLS Private Key file. Default is 'cakey.pem' |
| -trace_cpumem | Allow tracing the CPU/MEM per second in sipp_<pid>_cpumem.csv file. |
| -trace_err | Trace all unexpected messages in <scenario file name>_<pid>_errors.log. |
| -trace_logs | Allow tracing of <log> actions in <scenario file name>_>pid<_logs.log. |
| -trace_msg | Displays sent and received SIP messages in <scenario file name>_<pid>_messages.log |
| -trace_retrans | Allow tracing number of retransmission per second in <scenario_name>_<pid>_retrans.csv file. |
| -trace_rtt | Allow tracing of all response times in <scenario file name>_<pid>_rtt.csv. |
| -trace_scen | Allow tracing of scenario execution, result and response times in sipp_<pid>_scen.csv. (multi-scenario usage) |
| -trace_screen | Dump statistic screens in the <scenario_name>_<pid>_screens.log file when quitting SIPp. Useful to get a final status report in background mode (-bg option). |
| -trace_stat | Dumps all statistics in <scenario_name>_<pid>.csv file. Use the '-h stat' option for a detailed description of the statistics file content. |
| -trace_timeout | Displays call ids for calls with timeouts in <scenario file name>_<pid>_timeout.log |
| -up_nb | Set the number of updates of the internal clock during the reading of received messages. Default value is 1. |
| -user_inf file_name | Similar to -inf but for pre-loading user data. |
| -user_ip file_name | Ip list to be used by users (Requiered MULTI_IP_SUPPORT build option). |
| -users | Instead of starting calls at a fixed rate, begin 'users' calls at startup, and keep the number of calls constant. |
| -v | Display version and copyright information. |
| -3pcc ip:port | Launch the tool in 3pcc mode ("Third Party call control"). The passed ip address is depending on the 3PCC role. - When the first twin command is 'sendCmd' then this is the address of the remote twin socket. SIPp will try to connect to this address:port to send the twin command (This instance must be started after all other 3PCC scenarii). Example: 3PCC-C-A scenario. - When the first twin command is 'recvCmd' then this is the address of the local twin socket. SIPp will open this address:port to listen for twin command. Example: 3PCC-C-B scenario. |
Signal handling:

   SIPp can be controlled using posix signals. The following signals
   are handled:
   USR1: Similar to press 'q' keyboard key. It triggers a soft exit
         of SIPp. No more new calls are placed and all ongoing calls
         are finished before SIPp exits.
         Example: kill -SIGUSR1 732
   USR2: Triggers a dump of all statistics screens in
         <scenario_name>_<pid>_screens.log file. Especially useful
         in background mode to know what the current status is.
         Example: kill -SIGUSR2 732

Exit code:

   Upon exit (on fatal error or when the number of asked calls (-m
   option) is reached, sipp exits with one of the following exit
   code:
    0: All calls were successful
    1: At least one call failed
   97: exit on internal command. Calls may have been processed
   99: Normal exit without calls processed
   -1: Fatal error


Example:

   Run sipp with embedded server (uas) scenario:
     ./sipp -sn uas
   On the same host, run sipp with embedded client (uac) scenario
     ./sipp -sn uac 127.0.0.1
Getting support
You can likely get email-based support from the sipp users community. However, always clearly mention that your message is about IMS Bench SIPp and not the "vanilla" SIPp because IMS Bench SIPp has just been released and most SIPp users are therefore using the vanilla SIPp and will not know about the specifics of IMS Bench SIPp. Also a bug in IMS Bench SIPp might not be present in the vanilla SIPp and vice-versa.
The mailing list address is sipp-users@lists.sourceforge.net. To protect you from SPAM, this list is restricted (only people that actually subscribed can post). Also, you can browse the SIPp mailing list archive: http://lists.sourceforge.net/lists/listinfo/sipp-users
Contributing
Of course, we welcome contributions! If you implemented new scenarios from the IMS/NGN Performance Benchmark specification or if you added a new feature to IMS Bench SIPp, please send the "diff" output (diff -bruN old_sipp_directory new_sipp_directory) on the SIPp mailing list, so that we can review and possibly integrate it in IMS Bench SIPp (and/or SIPp).
by Richard GAYRAUD [initial SIPp code], Olivier JACQUES [SIPp code/documentation], David Verbeiren (Intel) [IMS Bench], Philippe Lecluse (Intel) [IMS Bench], Xavier Simonart (Intel) [IMS Bench], Many SIPp contributors [code]


