

Seagull - Core
- Installation
- Using Seagull
- Concepts and definitions
- Seagull scenario
- Message and parameters control
- External data management
- Authentication
- Statistics
- Logs and traces
- Configuration files
- Correlation
- Getting support
- Reference
- Miscellaneous tools
Installation
Platforms supported
- Linux: Seagull supports Linux. It has been successfully tested with Debian, RedHat Advanced Server 2.1, RedHat Enterprise Linux 3.0, Suse 9.3 and Fedora core 3. It should be no problem for Seagull to work on other Linux platforms by compiling Seagull from the sources.
- HPUX 11i (PA-RISC and IA64): supported.
- HPUX 11.23 (PA-RISC and IA64): supported.
- Windows/cygwin: supported, only for IP-based protocols (for functional testing and limited load testing).
Installing Octave
Seagull relies on "Octave" to analyze detailed statistics and to provide plotting capability.
There are 3 options to install Octave:
- If you installed your system using CD/DVDs: locate the Octave packages and install them.
- Download Octave for your distribution (using urpmi or apt tools).
- On a Windows PC, install "Cygwin" and install Octave during Cygwin installation.
Compiling Seagull from source code
If the binary package is not available on your platform or if you want to modify Seagull source code to add you own features, you will need to compile Seagull from the source code.
Decompress the source code tarball:
gunzip seagull-x.y.z.tar.gz
tar -xvf seagull-x.y.z.tar
This will create a directory called seagull. Go to this directory and edit "build.conf" file to add or remove sections you want to include during compilation time. To compile seagull:
cd seagull
./build.ksh
Executables are located in bin/. Copy them in /usr/local/bin and you should be ready to go.
Installing Seagull
First, unzip and untar the Seagull archive file that corresponds to your platform:
seagull-[tool version]-[OS]-[OS release version].tar.gz
Then, use the package installer of your platform:
- HPUX 11i/11.23:
swinstall -s /full_path_to_the_depot/seagull-core-[tool version]-[OS]-[OS release version]-[processor].depot
swinstall -s /full_path_to_the_depot/seagull-[protocol]-[tool version]-[OS]-[OS release version]-[processor].depot
- Linux RedHat-new and Fedora core 3 install:
rpm -ivh seagull-core-[tool version]-[OS]-[OS release version]-[processor].rpm
rpm -ivh seagull-[protocol]-[tool version]-[OS]-[OS release version]-[processor].rpm
- Linux Debian:
dpkg -i seagull-core-[tool version]-[OS]-[OS release version]-[processor].deb
dpkg -i seagull-[protocol]-[tool version]-[OS]-[OS release version]-[processor].deb
- Cygwin: user auto-extractible executable under Windows.
Once the installation is done, the following directories are available:
- /opt/seagull/seagull/doc directory contains the documentation for all the protocols.
- /opt/seagull/[protocol]/doc directory contains protocol documentation.
- /opt/seagull/[protocol]/config directory contains the XML configuration files, as described in the "Configuration files" section, and the dictionaries, as described in the "Protocol dictionaries" section.
- /opt/seagull/[protocol]/logs directory is empty. It is meant to contain execution log files.
- /opt/seagull/[protocol]/run directory contains examples of shell scripts to run the client and server to execute your scenarios.
- /opt/seagull/[protocol]/scenario directory contains the example scenarios.
The installation also creates the following files in the bin directory:
/usr/local/bin/
     seagull
     computestat.ksh
     plotstat.ksh
     startoctave_plot.ksh
     startoctave_stat.ksh
     csvextract
     csvsplit
     [library-files].so
/usr/local/bin directory contains the binaries of Seagull. Make sure that this directory is in your user path by typing
ocadmin@myhost:~$ type seagull
seagull is /usr/local/bin/seagull
If Seagull can't be found, type:
export PATH=$PATH:/usr/local/bin
Uninstalling Seagull
To remove Seagull from your system:
- On HPUX 11i/11.23, use swremove command.
- On Linux with rpm packager
- find the list of packages to remove:
rpm -aq | grep seagull
- Remove all the packages given by the previous command:
rpm -e package-name
- find the list of packages to remove:
- On cygwin, use the Windows uninstaller.
Upgrading Seagull
To upgrade from a previous version of Seagull:
- On HPUX 11i/11.23, follow uninstall procedure and then install procedure.
- On Linux with rpm packager:
rpm -Uvh seagull-core-[tool version]-[OS]-[OS release version]-[processor].rpm
rpm -Uvh seagull-[protocol]-[tool version]-[OS]-[OS release version]-[processor].rpm
- On cygwin, follow the install procedure.
Using Seagull
Traffic profile
The traffic profile is the evolution over time of the number of scenario attempts per second (call rate). By default, the traffic profile is constant, meaning that you set the rate at x, and it will remain x until you quit Seagull. You can change the rate of scenario attempts interactively using the keyboard or using the remote control interface.
A simple Perl script (ctrl.pl) is provided with Seagull to demonstrate the capabilities of the remote control interface as well as providing a way to create a repeatable traffic profile.
ctrl.pl takes two arguments: Seagull's remote control address (as specified on the controlled Seagull through "-ctrl IP:PORT" command line option) and the traffic profile scenario to execute.
A sample scenario (scenario.txt) is also provided:
# Comment 1
' Comment 2
SET RATE 20 CPS
WAIT 2S
DUMP
WAIT 2S
DUMP
SET RATE 40 CPS
WAIT 2S
DUMP
WAIT 2S
DUMP
RAMP 100 IN 30S
WAIT 10S
DUMP
WAIT 10S
DUMP
WAIT 10S
DUMP
This scenario sets the rate to 20 scenario attempts per second, waits 2 seconds (this is done at ctrl.pl level, not at Seagull level), dumps the counters, waits another 2 seconds, dumps the counters again, sets the rate to 40 scenario attempts per second, and so on. It creates the following traffic profile:

Controlling Seagull
Seagull can be controlled in three ways:
- Interactively: using the keyboard attached to the terminal running Seagull
- Remotely: using the http server embedded in Seagull
- Posix signals: using Posix signals to stop the traffic
Keyboard control
Seagull can be controlled interactively using the keyboard. As there are many keys available to control Seagull, you can press "h" at any time to see the keys available and their function:
  |-----------------------------------------------------------------------------|
  | Key: Description                                                            |
  |-----------------------------------------------------------------------------|
  |+ : Increase call rate by call-rate-scale (default 1)                        |
  |- : Decrease call rate by call-rate-scale (default 1)                        |
  |c : Command mode (format : set var value)                                    |
  |    set call-rate      50 : call-rate become 50 c/s                          |
  |    set call-rate-scale 5 : use ± key to increase/decrease call-rate by 5    |
  |q : Tool exit (forced when pressed two times)                                |
  |p : Pause/Restart traffic                                                            |
  |b : Burst traffic (after pause)                                             |
  |f : Force init scenario (switch to traffic)                                  |
  |d : Reset cumulative counters for each stat set in config file               |
  |a : activate/deactivate: percentage in Response time screen                  |
  |1 : Traffic screen                                                           |
  |2 : Response time screen                                                     |
  |h : Help screen                                                              |
  |3 : Protocol octcap-itu screen(s)                                            |
  |A : Scenario traffic stats                                                   |
  |B : Scenario default 0 stats                                                 |
  |C : Scenario default 1 stats                                                 |
  |D : Scenario default 2 stats                                                 |
  |E : Scenario default 3 stats                                                 |
  |--- Select a key ----------------------- Next screen : Press the same key ---|
Notice that all the lines after "h : Help screen" are optional. In our example they appear because the protocol statistics (see line "3 : Protocol octcap-itu screen(s)") and the scenario statistics (lines from A to E) have been turned on.
Description of the keyboard controls:
Control keys
| Key | Short description | Long description |
|---|---|---|
| + | Increase the call rate | This key allows to increase the call rate from the call-rate-scale value.
The default value of the call-rate-scale is 1. Usable only in client mode. It has no effect in server mode. |
| - | Decrease the call rate | This key allows to decrease the call rate from the call-rate-scale value.
The default value of the call-rate-scale is 1. Usable only in client mode. It has no effect in server mode. |
| c | Command | This key allows to change any parameter in the configuration during traffic. For example: * press 'c', then 'set call-rate 10' to change the value of the call rate to 10. * press 'c', then 'set call-rate-scale 5' to change the value of the call-rate-scale to 5. Usable only in client mode. It has no effect in server mode. |
| q | Stop the traffic and quit the tool | In server mode, Seagull does not accept any
new incoming call. Once all ongoing calls are finished, the
tool exits. In client mode, Seagull does not place any new call. Once all ongoing calls are finished, Seagull exits Pressing the q/ctrl-C key a second time forces Seagull to quit, even if all ongoing calls are not finished. |
| p | Pause/Restart the traffic | In server mode, Seagull does not accept any
new incoming call. Current calls continue. In client mode, Seagull does not place any new call. Ongoing calls are processed normally. By pressing p key a second time, seagull will restart traffic. In server mode, Seagull accepts again new incoming call. In client mode, Seagull smoothly restarts the traffic, to go back to the required call rate. |
| b | Burst traffic (only available in client mode) | Once the traffic is paused, restart traffic. In client mode, Seagull will try to create all missed calls during the pause (for example, for a 5s pause with a 10c/s call rate, seagull will try to start 5*10=500 calls when the "b" key is pressed). |
| f | Force without init | This key allows to jump directly to the "traffic" section of a scenario, without waiting for the "init" section to be completed. |
| d | Reset cumulative counters for each statistics set in config file | Reset the counters. This option is available only if log-stat, log-protocol, display-protocol or display-scenario statistics options are set in the configuration file. |
| 1 | Display the main statistics screen | Display the main screen with the general statistics. Press "1" again to display the statistics per scenario. |
| 2 | Display the response time screen | The second column gives the percentage of the calls for each response time range, if the percentages are activated (see 'a' key). This screen is relevant only if you set the proper options in the configuration files and if you set the start and stop of the timer in the scenario (see the statistics chapter). |
| a | Activate/deactivate the percentage computation | This key activates or deactivates the computation of the percentages of the response times screen, only if the log-stat is set in the configuration file and if you set the start and stop of the timer in the scenario (see the statistics chapter). |
| h | Show the help screen | Press on h to show the help screen. If you see "Next screen: press the same key", press h again to see the second help screen. |
| Numbers above or equal to 3 | Show protocol statistics screen | If you asked for statistics at the protocol level, you can reach the corresponding screen by pressing the
corresponding number. 3 is for the first protocol, 4 for the second one, 5 for the third one, and so on for all the protocols used. The possible values go from 3 to 0, so there are a maximum of 8 protocol statistics screens. |
| Uppercase letters (starting with A) | Show scenario section statistics | If you asked for statistics at the scenario level, you can reach the corresponding screen by pressing the
corresponding letter. A is for the first section in the scenario, B for the second one, C for the third one, and so on for all the sections used in your scenario. The number of scenario section statistics screens is limited to 26. |
Remote control
Description
Seagull can be remotely controlled through a remote connection using
the HTML protocol and a dictionary that is provided at run time (-ctrldicopath command line option),
the default being /opt/seagull/config/remote-ctrl.xml.(/usr/local/share/seagull/config/remote-ctrl.xml for versions before 1.8.0.1)
This feature is activated with a run time option : -ctrl address:port
("address:port" : the address and the port on which seagull listens for remote control commands)
Using HTTP makes it very easy to remotely control Seagull, either directly from a browser or from higher level languages like Perl or Python.
In particular, this allows to:
- Control a cluster of Seagull instances (hosted on one or several systems)
- Control the traffic profile over time (see the example with ctrl.pl Perl script)
- Automate benchmark test sessions
- Easily create a Graphical User Interface for Seagull control and monitoring (through http, AJAX, Eclipse plugin, ...)
- Create real time graphs with Seagull statistics (dump command)
The following configurations are possible:

Control commands
The following remote control commands are implemented:
-
Dump: to dump the statistics counters. This is done by sending
an HTTP "GET" with URI:
http://x.y.z.t:p/seagull/counters/all
-
Set rate: to set the rate of scenario attempts per second. This is done by sending
an HTTP "PUT" with URI:
http://x.y.z.t:p/seagull/command/rate?value=n
-
Ramp: to linearly increase or decrease the rate of scenario attempts per second,
from the current value to a target value in a number of seconds.
This is done by sending an HTTP "PUT" with URI:http://x.y.z.t:p/seagull/command/ramp?value=n&duration=d
-
Stop: to ask seagull to quit . This is done by sending
an HTTP "PUT" with URI:
http://x.y.z.t:p/seagull/command/stop
-
Pause: to ask seagull to pause/restart the traffic. This is done by sending
an HTTP "PUT" with URI:
http://x.y.z.t:p/seagull/command/pause
-
Burst: to ask seagull to make a burst when the traffic is paused seagull will try to create all
missed calls during the pause (only for client).
This is done by sending an HTTP "PUT" with URI:http://x.y.z.t:p/seagull/command/burst
Posix signal control
It is also possible to stop the traffic using POSIX signals. This is especially useful when running Seagull in background mode (-bg option, see the command line help).
kill -SIGUSR1 pid has the same effect as the 'q' key. You can force the traffic to stop by issuing a second kill -SIGUSR1 pid.
Navigating through the screens
Here is the screen that you see when you launch Seagull:
|------------------------+---------------------------+-------------------------|
| Start/Current Time     |       2005-12-14 10:04:11 |     2005-12-14 10:06:53 |
|------------------------+---------------------------+-------------------------|
|    Counter Name        |      Periodic value       |     Cumulative value    |
|------------------------+---------------------------+-------------------------|
| Elapsed Time           | 00:00:01:008              | 00:02:41:596            |
| Call rate (/s)         |   75.397                  |   41.505                |
|------------------------+---------------------------+-------------------------|
| Incoming calls         |       76                  |     6707                |
| Outgoing calls         |        0                  |        0                |
| Msg Recv/s             |  149.802                  |   82.985                |
| Msg Sent/s             |  149.802                  |   82.979                |
| Unexpected msg         |        0                  |        0                |
| Current calls          |        3                  |    0.019                |
|------------------------+---------------------------+-------------------------|
| Successful calls       |       75                  |     6704                |
| Failed calls           |        0                  |        0                |
| Refused calls          |        0                  |        0                |
| Aborted calls          |        0                  |        0                |
| Timeout calls          |        0                  |        0                |
|------------------------+---------------------------+-------------------------|
| Last Info              | Incomming traffic                                   |
| Last Error             | No error                                            |
|--- Next screen : Press key 1 ----------------------- [h]: Display help ------|
At the bottom left, there is an invitation to press 1. Pressing the 1 key will get you to the following screen, that displays the number of successfull occurences of each types of scenarios (init, traffic, default and abort):
|------------------------+---------------------------+-------------------------|
| Success init calls     |        0                  |        0                |
| Success traffic calls  |       76                  |    13125                |
| Success default calls  |        0                  |        1                |
| Success abort calls    |        0                  |        0                |
|------------------------+---------------------------+-------------------------|
|                                                                              |
|                                                                              |
|                                                                              |
|                                                                              |
|                                                                              |
|                                                                              |
|                                                                              |
|                                                                              |
|                                                                              |
|                                                                              |
|                                                                              |
|                                                                              |
|                                                                              |
|                                                                              |
|                                                                              |
|                                                                              |
|                                                                              |
|--- Next screen : Press key 1 ----------------------- [h]: Display help ------|
Press 1 again to come back to the first screen.
Concepts and definitions
Scenario
A scenario is what gets executed by Seagull. Composed of multiple sections, each section is a sequence of commands, described in XML. Within a scenario section, <send> and <receive> commands are used to send and receive protocol messages.
Session-Id
The Session-Id is a generic concept in Seagull. Under classical usage, session-ids are not seen by the user. It can become handy to understand what a session-id is.
A Session-Id maps to one or several protocol fields. How the mapping is done is indicated in the dictionary. For example, in Diameter, the session-id maps to Diameter's Session-Id avp. In H248, session-id maps to H.248's transaction-id.
A session-id is valid for a channel. Thus, a scenario that makes use of multiple channels will have multiple session-ids.
Let's take the example of a scenario which uses one channel. The scenario is the following:
  <send channel="trans-ip-v4">
    <action>
      <!-- For each new call, increment the session-ID counter -->
      <inc-counter name="HbH-counter"> </inc-counter>
      <inc-counter name="EtE-counter"> </inc-counter>
      <inc-counter name="session-counter"> </inc-counter>
      <set-value name="HbH-id"
                 format="$(HbH-counter)"></set-value>
      <set-value name="EtE-id"
                 format="$(EtE-counter)"></set-value>
      <set-value name="Session-Id"
                 format=".;1096298391;$(session-counter)"></set-value>
    </action>
    <command name="SAR">
      <avp name="Session-Id" value="value_is_replaced"> </avp>
      <avp name="Vendor-Specific-Application-Id">
        <avp name="Vendor-Id" value="11"></avp>
        <avp name="Auth-Application-Id" value="167772151"></avp>
        <avp name="Acct-Application-Id" value="0"></avp>
      </avp>
      <avp name="Auth-Session-State" value="1"> </avp>
      <avp name="Origin-Host" value="seagull"> </avp>
      <avp name="Origin-Realm" value="ims.hpintelco.org"> </avp>
      <avp name="Destination-Realm" value="ims.hpintelco.org"> </avp>
      <avp name="Server-Name" value="seagull"> </avp>
      <avp name="Server-Assignment-Type" value="3"> </avp>
      <avp name="User-Data-Request-Type" value="0"> </avp>
      <avp name="Public-Identity"
           value="sip:olivierj@ims.hpintelco.org"> </avp>
      <avp name="Destination-Host" value="hss.ims.hpintelco.org"> </avp>
    </command>
    <action>
      <start-timer></start-timer>
    </action>
  </send>

  <receive channel="trans-ip-v4">
    <action>
      <stop-timer></stop-timer>
    </action>
    <command name="SAA">
    </command>
  </receive>
|
When sending the message, Seagull initializes the session-id with the value of "Session-Id" AVP, as indicated in Diameter's dictionary When receiving a message, Seagull tries to find the session-id in the list of its known session-ids. If the parameter corresponding to the session-id (as indicated in the dictionary) is not found, then Seagull will look at parameters indicated by "out-of-session-id" parameters in the dictionary. |
In some cases, the session-id value is not in a unique field and may need to be found in other fields. To resolve this, multiple out-of-session-id fields can be defined in the dictionary. If a message is received with no session-id field or with an unknow value in the session-id field, then seagull looks for the first out-of-session-id field if defined. If this first out-of-session-id field is not present or its value is unknown, seagull looks for the second out-of-session-id field if defined and so on ... The most probable out-of-session-id field must be placed at the top of the list of out-of-session-id fields in the dictionary to optimize the execution.
When a message is received and cannot be matched to a known session-id value (whether this value was related to the session-id field or one of the defined out-of-session-id fields), then it is treated as a "new (incoming) call".
Transport protocols and channels
Seagull messages are sent/received using a transport protocol. Several transport protocols can be used: TCP, UDP or SCTP, all three over IPv4 or IPv6. In addition, HP OpenCall SS7 can be used to provide TCAP over SS7 transport. See TCAP documentation for more details.
You first have to define the transport to use. This is done in the generic configuration file (see example below). Then you can open channels for the transport that you have defined. You can open one or several channels. Each channel can be on the same or on different transports, and can use the same or a different protocol.

A channel makes the link between a transport and a protocol.
Transport and channels are defined in the generic configuration file
Here are some examples:
- Example using TCP over IPv4:
<define entity="transport" name="trans-ip-v4" file="libtrans_ip.so" create_function="create_cipio_instance" delete_function="delete_cipio_instance" init-args="type=tcp"> </define> <define entity="channel" name="channel-ip-1" protocol="Protocol" transport="trans-ip-v4" open-args="mode=client;dest=192.168.0.13:3868"> </define> - Example using TCP over IPv6:
<define entity="transport" name="trans-ip-v6" file="libtrans_ip.so" create_function="create_cipio_instance" delete_function="delete_cipio_instance" init-args="type=tcp"> </define> <define entity="channel" name="channel-ip-1" protocol="Protocol" transport="trans-ip-v6" open-args="mode=client;dest=[fec0::5:20f:20ff:fefe:ea51]:3868"> </define> - Example using TLS over IPv4:
<define entity="transport" name="trans-ip-tls" file="libtrans_iptls.so" create_function="create_ciptlsio_instance" delete_function="delete_ciptlsio_instance" init-args="method=SSLv23;cert_chain_file=xxx;private_key_file=yyy;passwd=zzz"> </define> <define entity="channel" name="channel-tls" protocol="Protocol" transport="trans-ip-tls" open-args="mode=client;dest=192.168.0.10:3868"> </define> - Example using SCTP over TCP:
  <define entity="transport"
    name="trans_sctp"
    file="libtrans_extsctp.so"
    create_function="create_cipsctpio_instance"
    delete_function="delete_cipsctpio_instance"
    init-args="type=tcp">
  </define>

  <define entity="channel"
    name="channel-sctp"
    protocol="Protocol"
    transport="trans-sctp"
    open-args="mode=client;dest=127.0.0.1:7000">
  </define>
For more details, see "Transport Configuration".
SCTP transport
Seagull supports SCTP transport with SCTP library in version 1.5 and SCTP Socket api library in version 1.9.0 (refer to www.sctp.de).
Multi-channels
Seagull supports several channels in one single scenario. This means that you can create a scenario that for example sends a message on channel 1, receives the answer on channel 1, then sends a message on channel 2 and receives the answer on channel 2.
Traffic Models
Seagull generates traffic using different model types:
Example of traffic generated for:
1 call/s

10 calls/s

100 calls/s

Example of traffic generated for:
1 call/s

10 calls/s

100 calls/s

Example of traffic generated for:
1 call/s

10 calls/s

100 calls/s

This parameter is set in the configuration file of the client.
For more details, see "Generic configuration".
Seagull scenario
Scenario sections
A scenario describes the messages exchanged during traffic and their parameters. It contains several sections:
  <scenario>
    <counter>
    </counter>

    <correlation>
    </correlation>

    <init>
    </init>

    <default>
    </default>

    <abort>
    </abort>

    <traffic>
    </traffic>
  </scenario>
Counter section
The counter section contains a list of counters that are available during the traffic. This is useful, for example, to handle session-ids (the name varies depending on the protocol) which are used to identify calls in Seagull.
For example, the following code declares 3 counters: HbH-counter (initial value: 1000), EtE-counter (initial value: 2000) and session-counter (initial value: 0).
<counter>
  <counterdef name="HbH-counter" init="1000"> </counterdef>
  <counterdef name="EtE-counter" init="2000"> </counterdef>
  <counterdef name="session-counter" init="0"> </counterdef>
</counter>
Those counters can then be used in the scenario using the inc-counter and set-value scenario actions (see scenario actions section).
Correlation section
The correlation section is used to define rules to associate several session-ids to a single call. It supports scenario that use one or multiple channels.
Refer to the "Correlation" section for further details.
Init section
The init section is executed once, at the time the connection is setup (before any traffic). This can be in a server type or in a client type scenario.
This section can be used as a pre-amble to the traffic (like CER/CEA exchange for Diameter protocol).
The list of scenario commands that can be included in this section is described in the scenario command section.
Default section
The default section is executed when an unexpected message (not listed in the traffic section) is received. This can be a server type or a client type scenario.
There can be as many default sections as needed. Seagull tries to match the received message against the first message of the default section.
The default section is generally used to create defensive scenarios, so that Seagull can react when stress situations from the system under test are encountered.
By default, Seagull counts calls using a "default" scenario section as successful calls. You can choose to count them as failed calls or simply ignore them. To do so, you need to add a "behaviour" attribute to the default section. Values of the behaviour attribute can be either "ignore" or "failed". Example:
<default behaviour="ignore">
  <receive channel="channel-1">
    <primitive name="SCCP_USER_STATUS">
    </primitive>
  </receive>
</default>
The list of scenario commands that can be included in this section is described in the scenario command section.
Abort section
The abort section is executed to finish a call when something wrong happened. The first command has to be a <send>
The list of scenario commands that can be included in this section is described in the scenario command section.
Traffic section
The traffic section is the main traffic. This can be in a server type or in a client type scenario.
The list of scenario commands that can be included in this section is described in the scenario command section.
Actions in scenarios
The <send> and <receive> scenario commands can include <action> and <message> sections.
The <action> section can be placed before and/or after the <message> section.
Actions placed before the message (called "pre-actions") are executed just before the message is actually sent or received. Actions placed after the message (called "post-actions") are executed just after the message is sent or received.
There are many actions available. To name a few, you can increment call variables, start or stop a timer, store a parameter from an incoming message or re-inject it in an outgoing message, do controls on the message or inject values from an external data file. Click there to see the complete list.
<send>
  <action>    <!-- Pre-action  -->
  </action>
  <message>   <!-- Message     -->
  </message>
  <action>    <!-- Post-action -->
  </action>
</send>
Actions that can be placed before a message are actions to increment a counter before sending the message. Example:
   <send channel="channel-1">
     <action>
        <inc-counter name="session-counter"></inc-counter>
        <set-value name="user-id-1" format="$(session-counter)"></set-value>
     </action>
     <message name="FOO_BAR">
     </message>
   </send>
Actions that can be placed after a message are actions to store parameter values after the message has been received. Example:
   <receive channel="channel-1">
     <message name="FOO_BAR">
     </message>
     <action>
       <store name="SESSION-ID" entity="user-id-1"></store>
     </action>
   </receive>
The list of possible actions is available in the reference section. All actions can be pre- or post-actions.
Call variables
In order to have dynamical scenarios, Seagull has "call variables". Those variables are local to each call (each instance of the scenario) except for the counters which are global to the seagull instance.
Here is what is possible to do with call variables:
- Set the value of a protocol entity by using the set-value action.
- Increment a call variable within a call by using the inc-var action.
- Retrieve the value of a protocol entity in a call variable by using the store action.
- Put the value of a call variable in a protocol entity by using the restore action. In particular, this is how Diameter Hop-by-hop Id and End-To-End Id can be handled.
Counters
In order to have unique identifier for a seagull instance, Seagull has "counters". Those counters are as global variables to the seagull instance.
Here is what is possible to do with counters:
- Set the value of a protocol entity by using the set-value action.
- Increment a call counter by using the inc-counter action.
- Put the value of a call variable in a protocol entity by using the restore action.
Store and restore of protocol parameters
Some of the most useful actions are the store and restore actions. In the following example, we will explain how to use the store and restore actions for 3 protocols: SIP (text), Diameter (binary) and TCAP (api).
-
SIP (text). There are several ways to use
the store action for a text protocol:
-
You want the entire value of a protocol field:
in this case, the store action can simply be used as:
<store name="MYVAR" entity="via"></store>
The variable "MYVAR" contains the value of the Via header field.
Similarly, the Via header value can be restored using:<restore name="MYVAR" entity="via"></restore>
which will put the value of "MYVAR" in the Via header field (as declared in the dictionary). -
You want part of the value of a protocol field, using a regular expression:
in this case, the store action can include a regular expression:
<store name="MYVAR" entity="via">
  <regexp name="viabranch"
    expr="[Vv][Ii][Aa][    ]*:[  ]SIP/2.0/(UDP|TCP) ([A-Za-z0-9.:_-]*)(;branch=(.*))*"
    nbexpr="5"
    subexpr="4">
  </regexp></store>
The variable "MYVAR" contains the value of the branch field in the SIP via header.
Similarly, the Via branch value can be restored using:<restore name="MYVAR" entity="via-branch"></restore>
which will put the value of "MYVAR" in the via-branch header field (it will need to be declared in the dictionary).
-
You want the entire value of a protocol field:
in this case, the store action can simply be used as:
-
Diameter (binary): in a binary protocol, store and restore
actions can be done using directly the fields declared in the XML dictionary,
like this:
<store name="MYVAR" entity="via"></store>
and then:<restore name="MYVAR" entity="via"></restore>
-
OCTCAP (API): to store and restore
fields, you must identify which field you want to store and restore like this:
<store name="MYVAR" entity="TC_INVOKE" sub-entity="operation-data"
   instance="InitialDP-data" begin="5" end="10"></store>
Note that begin and end attributes are used to extract part of the operation-data (like correlation-id or called party number). Same for the restore:<restore name="MYVAR" entity="TC_CONTINUE" sub-entity="operation-data" instance="ApplyCharging-data" begin="9" end="14"></restore>
This will set the value of the operation-data field (starting octet 9, ending octet 14) in the TC_CONTINUE named "ApplyCharging-data" with the content of "MYVAR".
Message and parameters control
Even if Seagull is aimed at traffic, load and stress testing, it is possible to check messages and parameters during traffic.
Several levels of control are available and described in the following sections.
Enabling and disabling controls
Controls can be enabled at two different levels:
- Globally, in the generic configuration file.
- Globally, using -msgcheck parameter in the command line.
- Per message, in the scenario file, in a post-action section of a message:
<check-presence name="[FIELD_NAME]" behaviour="error"></check-presence>
Behaviour when a control fails
You can specify the behaviour of Seagull for the different controls. This behaviour can be defined at the control level (see examples in the following chapters) or globally. The rest of this section presents the ways to define a global behaviour.
Define in the XML configuration file "Warning" as the global behaviour when a control fails:
<define entity="traffic-param"
  name="msg-check-behaviour"
  value="W">
</define>
Define in the XML configuration file "Error and abort" as the global behaviour when a control fails:
<define entity="traffic-param"
  name="msg-check-behaviour"
  value="E">
</define>
The global behaviour is applied for all controls that do not have their behaviour attribute defined in the scenario.
If the control is OK, the scenario goes on. If the control fails, the behaviour is:
- Log a warning and continue the call
- Log an error and abort the call
Presence check
The goal of this control is to check for the presence of parameters as described in the scenario. There are two types of presence check:
- Presence: Seagull checks that at least the parameters listed in the scenario are present in the received message. If additional parameters are present, the call is still considered OK. But if any expected parameter is missing, then the control fails.
- Additional: Seagull checks that all and only the parameters listed in the scenario are present in the received message. If additional parameters are present, the call is considered failed. If any expected parameter is missing, then the specified behaviour is applied.
The type of presence check is set in the generic configuration file:
- To enable "Presence" check in the generic configuration file:
<define entity="traffic-param" name="msg-check-level" value="P"> </define> - To enable "Additional" check in the generic configuration file:
<define entity="traffic-param"
        name="msg-check-level"
        value="A">
      </define>
Example for Diameter protocol:
<receive channel="channel-1">
  <command name="SAA">
  </command>
  <action>
    <check-presence name="name_of_avp_to_check" behaviour="error"></check-presence>
  </action>
</receive>
Parameter value check
Seagull can also perform controls on the value of the fields (of the header or the body) of a message.
Those controls are defined in the scenarios.
Examples (as part of the receive section of a message in the scenario):
- Check the value of the field specified with "name" in the received message.
<!-- Diameter example-->
<check-value name="Vendor-Specific-Application-Id" behaviour="error">
</check-value>
- Check the value of the sub-entity of the field specified with "name=" and with "instance="
in the received message
<!-- TCAP example--> <check-value name="TC_INVOKE" sub-entity="operation-code" behaviour="error" instance="Client-1-data"> </check-value> - Check the value of a header field: you check that the field (specified with
"name") in the header of the message has the expected value, which in this specific case of TCAP
is defined in the configuration file.
<!-- TCAP example-->
<check-value name="d-address-pc" behaviour="error">
</check-value>
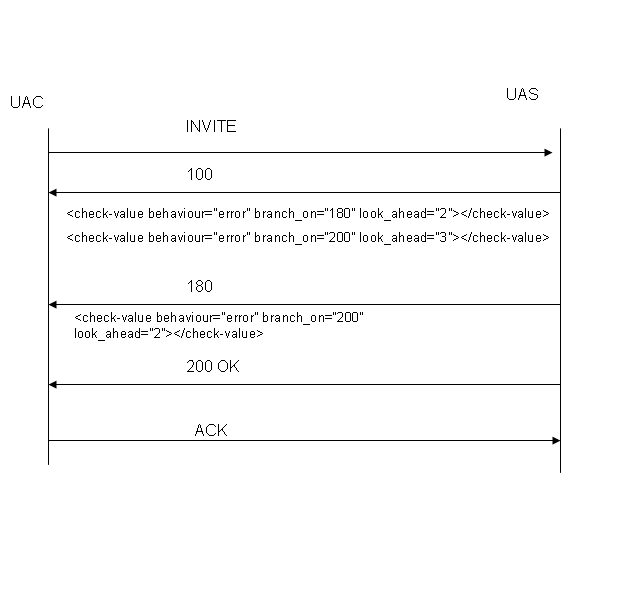
Examples for check-value usage for branching:
- For branching, only parameters required are branch_on, look_ahead or look_back; behaviour is also set as error,
to maintain check-value's structure. "name" is not needed for branching,so not maintained as mandatory param for check-value.
For a jump in the scenario,check-value has to be present as a post action, specifying that in case of an unexpected message received, what should the scenario do.
In case the unexpected message matches the value for branch_on, it would either jump as many sections in scenario,ahead or backwards, as specified by look_ahead,
or look_back params in the traffic section. Apart from handling unexpected messages, this feature can be used to handle optional messages.
This feature has limitations however, intended to be fixed in later releases.
One limitation being that, for the unexpected message received,no other actions apart from jump, will be executed.
An example involving sip protocol is below:
<!-- SIP example-->
<check-value behaviour="error" branch_on="100" look_ahead="2">
</check-value>
Message order check
Seagull can also perform controls on the order in which the parameters are received in the messages.
Those controls are defined in the scenarios.
In the case of TCAP, the order of reception of the components (eg TC_INVOKE) inside primitives (eg TC_BEGIN) can be checked.
Example: check that the parameter specified with "name" is received in second position.
<!-- TCAP example-->
<check-order name="TC_INVOKE" behaviour="error" position="1">
</check-order>
External data management
Description
Seagull allows to change the content of the messages before sending them, according to an external data file (CSV format). For each new scenario that Seagull executes, a new line is read from the external data file. This line contains the values of one or several fields which are used to change the content of a sent message on a per scenario basis. Lines can be read in sequence or randomly.
For example, this feature allows to provision a list of users or subscribers that are used during Seagull's traffic.
To use this feature, you need to specify "external-data-file" (file to read from) and "external-data-select" (how to read the file) parameters in the configuration file:
  <define entity="traffic-param"
          name="external-data-file"
          value="FULL_PATH/EXTERNAL_FILE.csv">
  </define>

  <define entity="traffic-param"
          name="external-data-select"
          value="sequential">
  </define>
The value of the "external-data-select" parameter can be "random" or "sequential". In the first case, the specific content for a message is taken randomly from the external data file. In the second case, the specific content for a message is taken in a sequential order (the first line of the external data file for the first call, the second line for the second call, etc.).
Here is an example of external data file:
 "string";"string";"number";
# FIELD 0        FIELD 1       FIELD 2
"0472826017" ;  "0x214365870921" ; "10" ;
"0472826027" ;  "0x214365870931" ; "12" ;
"0472826037" ;  "0x214365870941" ; "14" ;
"0472826047" ;  "0x214365870951" ; "16" ;
"0472826057" ;  "0x214365870961" ; "18" ;
"0472826067" ;  "0x214365870971" ; "20" ;
"0472826077" ;  "0x214365870981" ; "22" ;
Notice that the comments can be prefixed by # or // and that string values can be in ASCII (for example: "10" translates into 0x3130) or hexadecimal (for example: "0xA2") format.
The first line with characters and that does start by the comment sign is the line that defines the data types contained in the file. This line is mandatory. The types must belong to the basic types of Seagull: string, number, signed, number64 or signed64.
On each line of data, you can access a field (column) with its index: the first data on the line is field(0), the second one is field(1), and so on.
This index is used in the scenario to define which data field in the external file is used to fill the specified field ("entity") of the message to be sent.
The external data can also be used to fill a defined part of a field. In order to do so, the position in the buffer that represents the field to fill where to start to inject the data ("begin" parameter) and the position where to stop to inject the data ("end" parameter) need to be defined. When using the "begin" and "end" parameters, be careful that the count starts at zero for the first octet. Here is an example from a client scenario:
<restore-from-external field="1" entity="FIELD_NAME"
       begin="1" end="3">
       </restore-from-external>
In this example, the data (2 octets) is injected starting at the second octet (0 is the first octet, so 1 is the second octet). Two bytes of data are injected at the second octet and at the third octet.
The field FIELD_NAME must exist in the message to be sent, as defined in the dictionary. Its value in the current message before restore-from-external is executed is changed to the data of the second column (second because field="1").
Example

In this example, TCAP's operation-data with an initial value of "0x3016a00e820c48656c6c6f2c20776f726c64810100820100" will be altered from octet 5 to octet 11 (first octet is 0) so that the values will be:
- 0x3016a00e822143658709212c20776f726c64810100820100 for 1st scenario execution
- 0x3016a00e822143658709312c20776f726c64810100820100 for 2nd scenario execution
- 0x3016a00e822143658709412c20776f726c64810100820100 for 3rd scenario execution
- 0x3016a00e822143658709512c20776f726c64810100820100 for 4th scenario execution
- ...
Authentication
Authentication has been introduced in Seagull. Digest/MD5 and Digest/AKA are both supported.
To use it, an "external method" must be defined in the dictionary (refer to "external-method")
and the method must be defined in a set-value action for the field to be encoded (refer to "set-value").
See SIP authentication or Radius authentication
for further details based on examples.
Statistics
Statistics is an important part of a performance test tool. Seagull provides three different sets of statistics: global statistics, response time statistics, protocol and scenario statistics.
Raw statistics data is saved using CSV file format. This makes it easy to import the file in specialized applications, like Octave or Microsoft Excel to analyse the results and create graphs out of the results.
A new line of statistics is dumped for every statistics period, allowing to follow the statistics over time.
Global statistics
Global statistics are used to get global informations on the traffic. See config file reference / log-stat-* parameters to activate those statistics.
Those statistics have many counters. Here is the list. Counters can have a (P) or (C) appended to their name, meaning that the values are (C)umulative (from the beginning of the traffic) or (P)eriodic (for the statistics period, as specified by the log-stat-period traffic-param).
- StartTime: time when the traffic started
- LastResetTime: last time when periodic counters have been reset
- CurrentTime: current time
- ElapsedTime: time elapsed since StartTime (if C) or LastResetTime (if P)
- Rate: number of new calls per second
- IncomingCall: number of incoming calls
- OutgoingCall: number of outgoing calls
- MsgRecvPerS: number of messages received per second
- MsgSendPerS: number of messages sent per second
- UnexpectedMsg: number of unexpected messages
- CurrentCall: number of currently opened calls
- InitSuccessfulCall: number of successful init scenarios
- TrafficSuccessfulCall: number of successful traffic scenarios
- DefaultSuccessfulCall: number of successful default scenarios
- AbortSuccessfulCall: number of successful abort scenarios
- FailedCall: number of failed calls
- FailedRefused: number of failed calls because they were refused
- FailedAborted: number of failed calls because they were aborted
- FailedTimeout: number of failed calls because they timed out
If actions "start-timer" and "stop-timer" exist in the scenario, the following counter are updated :
- ResponseTime: average response time for the period (done in (P)eriotic and (C)umulative mode simultaneous)
-
ResponseTimeRepartition: response time repartition for a period according to the distribution set with the configuration parameter.
Default distribution values are : <50, <75, <100, <150, <300, <5000, >=5000 in ms.
The last two counters are updated when the action "stop-timer" is executed in the scenario whether the call succed or not.
Here is an example of a global statistic file (some counters have been removed):
StartTime;LastResetTime;CurrentTime;ElapsedTime(P);ElapsedTime(C);Rate(P);Rate(C);IncomingCall(P);IncomingCall(C);
2004-12-02 11:11:01;2004-12-02 11:11:01;2004-12-02 11:11:01;00:00:00;00:00:00;111.111;111.111;0;0;
2004-12-02 11:11:01;2004-12-02 11:11:05;2004-12-02 11:11:06;00:00:05;00:00:05;40.7837;40.9018;0;0;
2004-12-02 11:11:01;2004-12-02 11:11:10;2004-12-02 11:11:11;00:00:05;00:00:10;50.9287;45.9128;0;0;
2004-12-02 11:11:01;2004-12-02 11:11:15;2004-12-02 11:11:16;00:00:05;00:00:15;50.729;47.5145;0;0;
2004-12-02 11:11:01;2004-12-02 11:11:20;2004-12-02 11:11:21;00:00:05;00:00:20;50.729;48.3179;0;0;
2004-12-02 11:11:01;2004-12-02 11:11:25;2004-12-02 11:11:26;00:00:05;00:00:25;50.9287;48.838;0;0;
2004-12-02 11:11:01;2004-12-02 11:11:30;2004-12-02 11:11:31;00:00:05;00:00:30;50.729;49.153;0;0;
Here is a real example of generated file: server-stat.csv .
Response time statistics
While global statistics are used to monitor the traffic over time, response time statistics are meant to be used to measure time between two messages. This is what is usually used in performance test campaigns.

The parameters to be set in the configuration file are the following:
- 1) data-log-period
This number specifies the time interval (in seconds) at which the logs are dumped to file.
Example: if set to 10, the logs are dumped every 10 seconds. - 2) data-log-number
This number specifies the interval in number of messages at which the logs are dumped to file.
Example: if set to 500, the logs are dumped every 500 messages. - 3) data-log-file
It specifies the file to which the logs are dumped. Warning: if not set, no logs are available, even on the display screen !
- 4) data-log-rtdistrib
This number specifies the width of the distribution of the response times (in milliseconds !!) to be counted during the measurement interval. Here is an example, with the value set to 2000:

If data-log-period and data-log-number are both defined, then they are simultaneously active: the logs are dumped every X seconds AND every Y messages.
If data-log-rtdistrib is not defined in the configuration file, then the response time statistics look like:
time-ms;response-time-ms;
2210.899902;2159.582000;
3204.348877;2203.527000;
4124.591064;2123.738000;
5150.986084;2150.094000;
6124.566895;2123.638000;
7190.973877;2186.730000;
8151.060059;2150.058000;
9144.521973;2143.523000;
10171.154053;2166.825000;
11184.657959;2180.298000;
12121.958984;2120.847000;
13151.222900;2146.783000;
14151.293945;2150.089000;
15174.738037;2170.263000;
16201.378906;2196.880000;
17151.288086;2149.990000;
where the response-time-ms values correspond to the average response time since the previous statistics response time has been logged.
If all data-log-* parameters are defined in the configuration file, then the response time statistics look like:
Dump Periodic;
1149;1;
1156;4;
1169;1;
1196;1;
1216;1;
Dump Periodic;
1140;1;
1149;2;
1156;4;
1209;1;
1216;2;

....

Dump Cumulative;
1115;1;
1116;1;
1118;1;
1119;1;
1121;1;
1123;2;
1127;3;
1128;1;
1129;2;
1130;12;
1131;3;
1132;3;
1133;4;
1135;1;
1136;8;
1137;11;
1138;12;
...
This gives the distribution of the number of calls that have been counted during the measurement interval and globally for each response time value between 0 and data-log-rtdistrib milliseconds.
Protocol statistics
Protocol statistics are used to get global information on the traffic for a specified protocol. To activate protocol statistics, you must set the protocol parameters in the configuration file. Those parameters are the following:
- 1) display-protocol-stat
Setting this parameter to true enables the protocol statistics. If it is not set to true, you will not get any protocol statistics at screen of in log files, even if the following parameters are set.
- 2) log-protocol-stat-period
This number specifies the time interval (in seconds) at which the logs are dumped.
Example: if set to 5, the logs are dumped every 5 seconds. - 3) log-protocol-stat-name
This parameter specifies the names of the protocols for which the statistics are set. Put "all" to get statistics for all the used protocols. Otherwise, state the names of the protocols separated by semi-colons.
If you specify the names of several protocols and all, it will only consider the "all" keyword" and display statistics for all the protocols.
If you do not specify this parameter, you do not get any protocol statistics. - 4) log-protocol-stat-file
It specifies the file to which the logs are dumped.
If the display-protocol-stat parameter is set to true, but the log-protocol-stat-period is set to zero, you will not get any statistics displayed on screen. In this case, if you define the log-protocol-stat-file, you will get statistics in the file, even though you do not see them on screen.
Here is an example of the protocol statistics screen that you get (example from a TCAP execution):
|--------------------------------+---------------------+-----------------------|
|                                |  Periodic value     |   Cumulative value    |
| primitive                      |     sent | received |      sent |  received |
|--------------------------------+---------------------+-----------------------|
| MGT                            |        0 |        0 |         0 |         0 |
| NO_PRIMITIVE                   |        0 |        0 |         0 |         0 |
| SCCP_N_COORD                   |        0 |        0 |         0 |         0 |
| SCCP_N_COORD_RES               |        0 |        0 |         0 |         0 |
| SCCP_PC_STATUS                 |        0 |        0 |         0 |         0 |
| SCCP_USER_STATUS               |        0 |        0 |         0 |         1 |
| SWITCH_DONE                    |        0 |        0 |         0 |         0 |
| SWITCH_STARTED                 |        0 |        0 |         0 |         0 |
| TC_BEGIN                       |        0 |       77 |         0 |     18280 |
| TC_CONTINUE                    |       77 |       77 |     18280 |     18277 |
| TC_END                         |       76 |        0 |     18276 |         0 |
| TC_NOTICE                      |        0 |        0 |         0 |         0 |
| TC_P_ABORT                     |        0 |        0 |         0 |         0 |
| TC_UNI                         |        0 |        0 |         0 |         0 |
| TC_U_ABORT                     |        0 |        0 |         0 |         0 |
|                                |                     |                       |
|                                |                     |                       |
|                                |                     |                       |
|                                |                     |                       |
|----------------------------------------- Next screen : Press the same key ---|
Scenario statistics
Scenario statistics are used to get information for each type of scenario that exist in the scenario file. Those can be: init, traffic, default and abort scenarios. To activate scenario statistics, the display-scenario-stat parameter must be set to true in the configuration file:
Here is an example of the scenario statistics screen (example from traffic scenario in a TCAP execution):
|--------------------------+-------------------------+-------------------------|
|                          | Messages   | Retrans    | Timeout    | Unexp.     |
|             TC_BEGIN <-- |      20702 |          0 |          0 |          0 |
|          TC_CONTINUE --> |      20702 |          0 |          0 |          0 |
|          TC_CONTINUE <-- |      20699 |          0 |          0 |          0 |
|               TC_END --> |      20699 |          0 |          0 |          0 |
|                          |                         |                         |
|                          |                         |                         |
|                          |                         |                         |
|                          |                         |                         |
|                          |                         |                         |
|                          |                         |                         |
|                          |                         |                         |
|                          |                         |                         |
|                          |                         |                         |
|                          |                         |                         |
|                          |                         |                         |
|                          |                         |                         |
|                          |                         |                         |
|                          |                         |                         |
|                          |                         |                         |
|                          |                         |                         |
|                          |                         |                         |
|--------------------------+-------------------------+-------------------------|
Getting statistics out of response time raw data
Once you have the raw statistics data, you can use a variety of tools coming with Seagull to analyse the datas and get various statistics out of it: Number of values, minimum value, maximum value, average value, variance, standard deviation and N-th percentile.
A schema that summarizes the various tools:

-
csvsplit is used to create a reduced CSV file
from the raw CSV data. csvsplit combines two features:
- Sample raw CSV data by taking one measure out of "r"
- Suppress the beginning of raw CSV data to remove unwanted "startup" data
Usage:
$ csvsplit Syntax : csvsplit <in csv file> <out csv file> [-skip n] skip the n first values (default 0) [-ratio r] let 1 out of r value (default 10) -
computestat.ksh is used to compute the statistics
from the raw or sampled CSV data. computestat.ksh relies on Octave
to compute reliable statistical results.
Usage:
$ computestat.ksh -help
Command line syntax of /usr/local/bin/computestat.ksh - options
-in <file name>             : input file (default file.csv)
-out <file name>            : output file (default file.save)
-nth <percentile>           : nth percentile calculus (default 95)
-help                       : display the command line syntax
The output of computestat.ksh is a text file like the following:
[Using file        : client-rtt.2004-12-02.11:11:01.016.csv.y]
[number values     : 23136]
[minimum value     : 1.267000]
[maximum value     : 29.074000]
[average value     : 3.321995]
[variance          : 0.803202]
[standard deviation: 0.896216]
[95th percentile   : 5.410000]
-
plotstat.ksh is used to create graphics from the raw or sampled
CSV data. plotstat.ksh relies also on Octave
to create PNG graphical files.
Usage:
$ plotstat.ksh -help
Command line syntax of /usr/local/bin/plotstat.ksh - options
-in <file name>             : input file (default file.csv)
-out <file name>            : output file (default file.png)
-stat <file name>           : input stat file name (default no file)
If you specify a statistics results file that has been computed with computestat.ksh through the -stat option, then two additional plots will be drawn: one line for the average time and one line for the percentile.
Here is an example of the output of plotstat.ksh:

Logs and traces
The logging feature of Seagull provides several logging levels that can be combined (except A and N that are exclusive):
-
E-Errors
- Syntax error in config or scenario files
- Unable to open a file
-
W-Warnings - non blocking errors
- No init scenario
- No more call context availables
-
T-Traffic events
- Unexpected messages
- Refused calls
- Incorrect state
- M-Messages (decoded messages)
- B-Buffer (hex dumps)
-
V-Verdict (Trace the result of each call with its session-id in the log file)
If the call has no session id, no logs are traced.
Be awared that the session-id may not be unique in the log file.
The "Init" section is considered as a independant call.- passed : call is succesful
- failed : call is failed
- U-User logs (possibility to user to add user comments in the log file)
- A-All
- N-None
The log level is specified in the command line, using -llevel option. Example: -llevel EWT will log Errors, Warnings and Traffic events.
Configuration files
There are 3 different configuration files:
- Generic configuration file - describing traffic and network parameters
- Protocol dictionary configuration file - rarely to be edited
- Scenario file - describing the sequence of messages to exchange with the system under test and intermediate actions to perform

Generic configuration
The generic configuration file describes the network environment as well as traffic parameters.
The network environment is described by "transport channel entities". The transport entity is then used as an attribute of send and receive scenario commands, as well as during the opening of the transport channel (see below).
<!-- Synchro example -->
<?xml version="1.0" encoding="ISO-8859-1"?>
<configuration name="Simple IP Server Conf">

<define entity="transport"
    name="trans-ip-v4"
    file="libtrans_ip.so"
    create_function="create_cipio_instance"
    delete_function="delete_cipio_instance"
    init-args="type=tcp">
  </define>
<!-- Then you specify the opening of the channel, on the transport previously described. -->

<!-- For a server listening to port 15000, interface "192.168.0.13", it will look like this: -->

<define entity="channel"
    name="channel-1"
    protocol="command-synchro-v1"
    transport="trans-ip-v4"
    open-args="mode=server;source=192.168.0.13:15000">
  </define>

<!-- For a client sending messages to port 15000 on interface "192.168.0.13", it will look like this: -->
<define entity="channel"
    name="channel-1"
    protocol="command-synchro-v1"
    transport="trans-ip-v4"
    open-args="mode=client;dest=192.168.0.13:15000">
</define>
You can also specify traffic parameters in the configuration file, like the call rate, the name of the statistics file, etc.
  <define entity="traffic-param"
          name="call-rate"
          value="10">
  </define>
  <define entity="traffic-param"
          name="display-period"
          value="1">
  </define>

  <define entity="traffic-param"
          name="log-stat-period"
          value="5">
  </define>

  <define entity="traffic-param"
          name="log-stat-file"
          value="../logs/client-stat.csv">
  </define>
Protocol dictionary
In Seagull, messages and parameters of protocols used in a scenario are described in an XML dictionary. This allows a great flexibility to add new messages or parameters. You can create as many dictionaries as you want, for example to work with different flavors or versions of a protocol.
To specify the dictionary, use the -dico option in the command line:
-dico ../config/[dictionary-name].xml
To be able to work with a multi-protocol scenario, specify several dictionaries as arguments of the -dico option:
-dico ../config/[dictionary_1-name].xml ../config/[dictionary_2-name].xml
A dictionary contains several XML sections: protocol, types, header, body, dictionary:
Protocol
"protocol": this is the top level section. Depending on the protocol, some attributes can be configured there:
- Common for all protocols
- name: a name used to identify the protocol in the config file
- type: can be "text" (like XCAP or H248 text), "binary" (like Diameter), "external-library" (like OCTCAP) or "binary-body-not-interpreted" (to support some custom protocols)
- use-transport-library: "trans-ip" (TCP or UDP), "trans-extsctp" for SCTP, "trans-octcap" for OCTCAP (this refers to the name of the library file).
- For binary type
- padding (optional): padding to be used for the message length. A padding of 4 makes sure that the message size is a multiple of 4 octets.
- length (optional): by default, Seagull includes the headers to compute the message length. By putting length="header-excluded", Seagull does not include the headers to compute the message length. By adding <start-length/> in the header, the length will be computed starting from this point.
Example:

<header name="Message" length="msg-length" type="message-type">
    <fielddef name="some-field1" size="4" unit="octet"></fielddef>
    <start-length/>
    <fielddef name="msg-length" size="2" unit="octet"></fielddef>
    <fielddef name="message-type" size="4" unit="octet"></fielddef>
</header>
-
filter: to specify a filter to be used when reading the XML scenario before sending it.
Used to remove heading and trailing spaces or tabs, add additional CR/LF, ....
Example: "lib=libparser_h248.so;function=filter_h248"
-
field-separator: to specify the text sequence to be appended to each line in the XML scenario.
Example: field-separator="\r\n" will replace the end of line of the scenario with "\r\n".
-
body-separator: text sequence to be added between the header and the body sections.
Example: body-separator="\r\n" for XCAP, body-separator="{" for H248 text.
- context-factory-constructor: name of the constructor method of message (which is defined in the external library).
- context-factory-destructor: name of the destructor method of message (which is defined in the external library).
Types
"types": this section contains all the types needed for the protocol. An example of the Types section for the Diameter protocol is available there.
This section is optional (but becames mandatory if the protocol needs specific types).
Header
"header": this section contains the description of the message header. An example of
the Header section for the Diameter protocol is available there.
"fielddef" tags define elements of the header.
For a text protocol, all fields have the string type and they can have "regexp" tags to define them.
Example (SIP protocol):
<fielddef name="call-id"
          format="call-id: $(field-value)\r\n">
  <regexp name="call-id"
          expr="[Cc][Aa][Ll][Ll]-[Ii][Dd][   ]*:[  ]*([!-}]*).*$"
          nbexpr="2"
          subexpr="1">
  </regexp>
</fielddef>
For other protocols, several attributes are needed.
Example (OCTCAP protocol):
<fielddef name="uid"  type="number"
          set-function="set_primitive_uid"
          get-function="get_primitive_uid">
</fielddef>
This section is mandatory.
List of fielddef attributes
| Name | Description | Example |
|---|---|---|
| name | Name of the field. Any string without spaces. | - |
| size | Size of the field. | 2 |
| unit | Unit of the size. | octet |
| type | Optional. Type of the size (number, string or a type defined in the dictionary "types" section) | number |
| mask | Optional. For binary protocol. Mask of the field. If only a part of the field is significant, a mask can be applied to the value of the field. | 124 |
| to-string | Optional. For external protocol. Name of the function to convert the field from an integer value to a string value of the field. | - |
| from-string | Optional. For external protocol. Name of the function to convert the field from a string value to an integer value of the field. | - |
| set-function | Optional. For external protocol. Name of the function to set the value of the field. | - |
| get-function | Optional. For external protocol. Name of the function to get the value of the field. | - |
| default | Optional. Set a default value for the field. | - |
| config-field | Optional. If the value if set in the configuration file, name of the parameter of the configuration file. | - |
Body
"body": this section contains the description of the message body (which comes after the header). An example of the Body section for the Diameter protocol is available there.
This section is mandatory.
body-method
"body-method": this section contains the methods to be used to parse the body. It is composed of several "def-method" sections.
- name: Name of the body-method. It can be anything.
- method: It can be "length" (the length of the body to be parsed is indicated by the param parameter) or "parser"
- param: For a "length" method, it specifies the parameter to be used to indicate the body length (Example: param=Content-Length). For a "parser" method, it indicates the library and the function to be used (Example for XCAP: "lib=libparser_xml.so;function=parse_xml"; for H248: "lib=libparser_h248.so;function=parse_h248")
Example:
This section is mandatory.
external-method
"external-method": this section contains the methods to be used to encode fields. It is composed of several
"defmethod" sections. The concerned fields must refer to this method in the 'set-value' action in the
scenario with the attribute 'method' (see "set_value" action).
For now, "crypto_method" from "libtrans_iptls.so" library is the only available method.
An example is described for the SIP protocol at SIP authentication.
- name: Name of the method. It can be anything.
-
param: It indicates the library and the function to be used.
(Example: "lib=libtrans_iptls.so;function=crypto_method")
Example:
<external-method>
  <defmethod name="authentication"
             param="lib=lib_crypto.so;function=crypto_method">
  </defmethod>
</external-method>
This section is optional.
List of general purpose methods
| Name | Library | Description | Supported Seagull version |
|---|---|---|---|
| sys_time_ms | lib_generalmethods.so | System time in milliseconds. | >1.7 |
Dictionary
"dictionary": this section contains all possible messages and parameters.
In addition, several attributes are available:
- session-method: It can be "field", in which case a session or "call" is identified with a specified protocol field, or it can be "open-id", in which case a session or "call" is identified with the "open-id" (e.g. a socket id in case of HTTP)). "open-id" is currently implemented only for "text" and "binary" protocols.
- session-id (mandatory for a "field" session-method): Only for a "field" session-method. It specifies the field to be used to identify each session (or "call").
- out-of-session-id (optional for a "field" session-method): Only for a "field" session-method. It specifies a field to be used in backup of the one defined by the session-id attribute.
This section is mandatory.
Correlation
In general, instances of a scenario (aka calls) are identified, see Dictionary, either with a session-id (a protocol field) or with an open-id (a socket id).
In some cases, the session-id cannot be unique during the whole call: its value may be changed during the call and/or
a different field of the message (header or body) is used for the rest of the call.
In particular this can be the case if several channels are used during the scenario.
Here is an example of such call flow for which Seagull could play the role of client, server_1 or server_2:
  client                 server_1               server_2              |
    |                                                                 |
    |                                                                 | The client defines the session-id-1
    | session-id-1         |                                          |
    |--------------------->|                                          |
                           |                                          |
                           |                                          | The server_1 defines session-id-2 and sends it to the client via a field of the message
      session-id-1         |                                          |
    |<---------------------|                                          | The client receives a message with session-id-1 as session-id and that contains
                           |                                          | the value session-id-2 in another field of the message.
                           |  session-id-2        |                   | The client keeps this new session-id for the call (storing it into its "map")
                           |--------------------->|                   |
                           |  session-id-2        |                   |
                           |<---------------------|                   |
                                                  |                   |
                                            PAUSE |                   |
                     session-id-2                 |                   |
    |<--------------------------------------------|                   | The client receives a message with session-id-2 as session-id
    |                session-id-2                 |                   | It recognizes the call and continues it
    |-------------------------------------------->|                   |
    |

    ...
To support these situations Seagull provides the "correlation" feature.
It allows to use several session-ids for the same call.
At Seagull level and for each channel, a list (called "map") of the known session-ids is built
to match received messages to current calls.
A constraint is that Seagull must know the alternative session-id of a call before it can recognize any message
with this alternative session-id.
From a user perspective, the scenario includes a "correlation" section (detailed below) and the "label" tag is used
from the scenario commands (e.g. send and receive) to refer to the specific processing defined in the correlation section.
The correlation section is optional in the scenario file but it must be present to enable the correlation feature.
If not present, the "label" tags are ignored in the scenario commands and a call can only be identified by a single session-id value.
Example of a correlation section, see below for the details of the sub-sections:
<correlation>
   <channel name="channel-1">
      <retrieve>
         <search-in-map name="call-id"></search-in-map>
      </retrieve>

      <command name="command-1">
         <pre-action>
            <!-- For each new call, increment the callid counter -->
            <inc-counter name="callid-counter"> </inc-counter>
            <!-- And set the call-id field -->
            <set-value name="call-id"
                       format="$(callid-counter)@127.0.0.1"></set-value>
         </pre-action>

         <post-action>
            <store name="SID" entity="call-id"></store>
            <insert-in-map channel="channel-1" name="SID"></insert-in-map>
         </post-action>
      </command>

      <command name="command-1b">
         <post-action>
            <store name="alt-sid" entity="o"></store>
            <insert-in-map channel="channel-2" name="alt-sid"></insert-in-map>
         </post-action>
      </command>

   </channel>
   <channel name="channel-2">
      <retrieve>
         <search-in-map name="call-id"></search-in-map>
      </retrieve>
   </channel>
</correlation>
For each channel used in the scenario, a "channel" sub-section must be added. It contains at least the retrieve method and optionnally some commands.
The "retrieve" sub-section defines all the fields (defined in the dictionary) in which the session-id can
be located. For each such field, a "search-in-map" tag must be added.
For a new received message on a given channel, Seagull gets the value of the field defined in "name" and searches in its "map"
of call contexts to match a known call.
Example:
   <retrieve>
     <search-in-map name="Session-Id"></search-in-map>
     <search-in-map name="HbH-id"></search-in-map>
   </retrieve>
The "command" sub-section can contain any other actions of the scenario but it must be present
to host an "insert-in-map" action when it is necessary to store a new value of session-id for a call.
The "pre-action" tag defines the actions which must be done before the scenario command.
The "post-action" tag defines the actions which must be done after the scenario command.
The "insert-in-map" action is specific to the correlation feature.
It inserts in the list of known session-ids for the given "channel" the value of the "entity" (that is defined in the dictionary).
Example:
   <command name="command-1">
     <pre-action>
      <set-value name="HbH-id" format="$(HbH-counter)">
      </set-value>
     </pre-action>
     <post-action>
      <insert-in-map channel="channel-1" entity="HbH-id"></insert-in-map>
     </post-action>
   </command>
Finally the correlation "commands" defined above are linked to the scenario by setting a "label" into the
scenario command (send).
Example:
    <send channel="channel-1" label="command-1">
    <action>
      <start-timer></start-timer>
    </action>
    <command name="CER">
      <avp name="Origin-Host" value="seagull.ims.hpintelco.org"> </avp>
      <avp name="Origin-Realm" value="ims.hpintelco.org"> </avp>
      <avp name="Host-IP-Address" value="0x00010a03fc5e"> </avp> <!-- IPV4 10.3.252.94-->
      <avp name="Vendor-Id" value="11"> </avp>
      <avp name="Product-Name" value="HP Cx Interface"> </avp>
      <avp name="Origin-State-Id" value="1094807040"> </avp>
      <avp name="Supported-Vendor-Id" value="10415"> </avp>
      <avp name="Auth-Application-Id" value="167772151"> </avp>
      <avp name="Acct-Application-Id" value="0"> </avp>
      <avp name="Vendor-Specific-Application-Id">
        <avp name="Vendor-Id" value="11"></avp>
        <avp name="Auth-Application-Id" value="167772151"></avp>
        <avp name="Acct-Application-Id" value="0"></avp>
      </avp>
      <avp name="Firmware-Revision" value="1"> </avp>

    </command>
    <action>
      <stop-timer></stop-timer>
    </action>
  </send>
An example of the correlation feature is proposed for the SIP protocol: SIP correlation example.
Correlation with open id feature
The open-id feature is compatible with the correlation one.
The configuration is the same as a open id one:
Example:
<define entity="channel"
    name="channel-2"
    protocol="xcap-protocol"
    transport="trans-1"
    global="no"
    open-args="mode=client;dest=127.0.0.1:8080">
  </define>
The traffic section is not changed except the label:Example:
<send channel="channel-2" label="command-2">
      <action>
        <open args="mode=client;dest=127.0.0.1:8080"></open>
      </action>
      <message>
      ...
The correlation section has to be defined like this :
Example:
<channel name="channel-2">
    <retrieve>
      <search-in-map name="session-method-open-id"></search-in-map>
    </retrieve>

    <command name="command-2">
      <post-action>
        <insert-in-map channel="channel-2" name="default-session-id"></insert-in-map>
      </post-action>
    </command>

 </channel>
"session-method-open-id" is the key word to define a search of the id of the call by the socket."default-session-id" is the key word to let Seagull insert the id of the call into the map (here the socket of the call).
Getting support
For support on Seagull, please send your questions on Seagull users mailing list: gull-users@lists.souceforge.net. You will likely get support from Seagull users.
Reference
This section is the reference for all values and parameters of Seagull.
Generic configuration reference
Transport configuration
The following table is a list of transport channel parameters, that can be present in the generic configuration file.
List of transport channel parameters (transport entity)
| Name | Description | Recommended value |
|---|---|---|
| name | Name of the transport entity. Any string without spaces. | - |
| file | Shared library to be used for transport. | Value is "libtrans_ip.so" for TCP or UDP over IP, libtrans_iptls.so for TLS over IP (based on openssl library), "libtrans_extsctp.so" for SCTP (this one is based on an external SCTP library) and "libtrans_octcap.so" for TCAP. |
| create_function | Function used to create a transport instance | Value is "create_cipio_instance" for IP-based protocols, "create_ciptlsio_instance" for IP/TLS and "create_ctransoctcap_instance" for TCAP. |
| delete_function | Function used to delete a transport instance | Value is "delete_cipio_instance" for IP-based protocols, "delete_ciptlsio_instance" for IP/TLS and "delete_ctransoctcap_instance" for TCAP. |
| init-args | Arguments to be passed to the transport library. The arguments are separated by semi-colons (;). |
|
List of channel parameters (channel entity)
| Name | Description | Recommended value |
|---|---|---|
| name | Name of the transport entity. Any string without spaces. | - |
| protocol | Protocol to be used for this channel. | The value must correspond to one of the protocol name defined in a dictionary. |
| global | Indicate if a channel is declared and used globally (opened once) or needs to be opened for each scenario call (using the "open" action). By default, the channel is declared globally. adding global="no" will allow to open channels in the scenarios. | - |
| transport | Transport to be used for this channel | The value must correspond to one transport defined previously. |
| reconnect | Optional. If set to "yes", seagull tries to re-connect if the connection is lost. | yes |
| open-args | Arguments to specify connexion parameters.
|
- |
Generic configuration
This table is a list of traffic parameters, that can be present in the generic configuration file.
List of traffic parameters (traffic-param entity)
| Name | Description | Recommended value | Example |
|---|---|---|---|
| call-rate | Specify the call-rate in a number of calls per seconds. Only applicable to the client side. | - | <define entity="traffic-param" name="call-rate" value="500"> Indicates that Seagull will start with a steady call rate of 500 calls per seconds. |
| display-period | Define the refresh rate of on-screen information. 0 means that on-screen information is not displayed. See also display-protocol-stat and display-scenario-stat to set statistics. | 1 | <define entity="traffic-param" name="display-period" value="1"> Refreshes the screen every one second. |
| log-stat-period | log-stat-period is the periodicity, in seconds, of statistics dump in the statistic file (log-stat-file parameter). | 60 | <define entity="traffic-param" name="log-stat-period" value="60">: a new line in the statistic file is created every 60 seconds. |
| log-stat-file | The name of the statistic log file. The date is inserted between the name and the extension. WARNING: both log-stat-period and log-stat-file must be present for statistics to be activated. | - | <define entity="traffic-param" name="log-stat-file" value="client-stat.csv">: the statistics are saved in client-stat.2004-10-13.13:23:01.120.csv file. |
| data-log-file | The name of the response time data file. The date is inserted between the name and the extension. WARNING: you need to specify a file in order to activate the response time statistics. | - | <define entity="traffic-param" name="data-log-file" value="client-rtt.csv">: the response time statistics are saved in the file you specified. |
| data-log-period | The response time data is saved every n second period. If value is 0, then the data-log-number traffic-param is used. | 1 | <define entity="traffic-param" name="data-log-period" value="10">: the response time statistics are saved in the file every 10 seconds (default is 1 second). |
| data-log-number | The response time data is saved every m numbers of data. This ensure that memory usage does not get too high. | 200 | <define entity="traffic-param" name="data-log-number" value="500">: the response time statistics are saved in every 500 measures (default is 200 measures). |
| data-log-rtdistrib | Defines the value of the interval on which the messages are sampled. This value is in milliseconds. | - | <define entity="traffic-param" name="data-log-rtdistrib" value="2000"> </define> |
| response-time-repartition | The intervals in which the response time measures are going to be spreaded. | - | <define entity="traffic-param" name="response-time-repartition" value="25,50,75,100,125,150,200,250,300,350"> |
| log-file | The base name of the log file. The date is inserted between the name and the extension. | - | <define entity="traffic-param" name="log-file" value="client.log">: the logs are saved in client.2004-10-13.13:23:01.120.log log file. |
| files-no-timestamp | To specify to not insert the date between the name and the extension in the log files names. | - | <define entity="traffic-param" name="files-no-timestamp" value="true">: the logs are saved in "client.log" log file. |
| display-protocol-stat | Enable (true) / disable (false) the protocol statistics. If you set this parameter to false, you do not get any protocol statistics neither on screen nor dumped to file. | true | <define entity="traffic-param" name="display-protocol-stat" value="true"> </define> |
| log-protocol-stat-period | Specify the interval in seconds at which the logs are dumped. Example: if set to 5, the logs are dumped every 5 seconds. If you only want the logs dumped to file and you do not want information displayed on screen, set this value to 0. |
- | <define entity="traffic-param" name="log-protocol-stat-period" value="5"> </define> |
| log-protocol-stat-name | Specify the names of the protocols for which the statistics are set.
Put "all" to get statistics for all the protocols used. Otherwise, state
the names of the protocols separated by semi-colons. If you specify the names of several protocols and all, it will only consider the "all" keyword" and display statistics for all the protocols. If you do not specify this parameter, you do not get any protocol statistics. |
all | <define entity="traffic-param" name="log-protocol-stat-name" value="all"> </define> |
| log-protocol-stat-file | Specify the file in which the protocol logs are dumped. The name of the protocol and the time and date are added to the filename to make it unique. | - | <define entity="traffic-param" name="log-protocol-stat-file" value="../logs/server-protocol-stat.csv"> </define> |
| display-scenario-stat | Enable (true) / disable (false) the scenario statistics. Remember that the scenario statistics are only displayed on screen, and not dumped to file. | true | <define entity="traffic-param" name="display-scenario-stat" value="true"> </define> |
| number-calls | Number of calls to be done. It is available for client and server.
Once the number of calls is reached, no new calls are : - placed by the client(note that some additional calls can be placed, but no less) - accepted by the server. WARNING: the init section of the scenario is considered as one call for the server side. |
- | <define entity="traffic-param" name="number-calls" value="1000">: Placed (client) or accepted (server) at least 1000 calls. |
| call-timeout-ms | call-timeout-ms defines a timer after which, if the scenario is stuck, the call will be closed and marked as failed. 0 means that this feature is de-activated. | 0 | <define entity="traffic-param" name="call-timeout-ms" value="30000"> </define> specifies that a call that is stuck for more than 30s will be terminated. |
| call-open-timeout-ms | call-open-timeout-ms defines a timer after which, if the socket used by the call has not been properly open (if the system is overloaded for example), the call is marked as failed. 0 means that this feature is de-activated. | 0 | <define entity="traffic-param" name="call-open-timeout-ms" value="5000"> </define> mark the call as failed if the socket creation process has not been achieved within 5s. |
| call-timeout-behaviour-abort | If a timeout is detected for a call, this parameter defines the behaviour before closing the call.
If it is set to "true", the section "abort" is executed before closing the call. A message is logged if this parameter is set to true and the section "abort" is missing in the sceanrio. |
true | <define entity="traffic-param" name="call-timeout-behaviour-abort" value="true"> </define> |
| msg-check-level | Type of message check. Possible values are "P" (Presence check) and "A" (Additional field check). The default value is "P". | - | <define entity="traffic-param" name="msg-check-level" value="P"> </define> checks that at least all parameters listed in the scenario are present. |
| msg-check-behaviour | Behaviour in case of message check fails. Possible values are "E" (log error and abort call) and "W" (log warning and continue call). The default value is "W". | - | <define entity="traffic-param" name="msg-check-behaviour" value="E"> </define> |
| burst-limit (tuning) | The burst limit corresponds to the number of new calls that Seagull can place in a period of one second. This is used to smooth the load at the beginning of a traffic or when traffic resumes. | 50 | <define entity="traffic-param" name="burst-limit" value="50"> Indicates that Seagull will not place more than 50 new calls per seconds. |
| max-send (tuning) | max-send corresponds to the number of messages that can be sent in one scheduling loop. NB: in future versions of the tool, this value will not be accessible anymore. It will be computed from the call rate and the scenarii. | (call rate) * nb_send_per_scene | <define entity="traffic-param" name="max-send" value="250"> |
| max-receive (tuning) | max-receive corresponds to the number of messages that can be received in one scheduling loop. NB: in future versions of the tool, this value will not be accessible anymore. It will be computed from the call rate and the scenarii. | at least (call rate) * nb_recv_per_scene | <define entity="traffic-param" name="max-receive" value="250"> |
| select-timeout-ms (tuning) | Defines the value of the timer set when listening to the system,
waiting for the messages. Counter in milliseconds. For low call-rate, set a value at least lower than the smallest "wait" in the scenario. Be careful, the lower the value, the more CPU time will used. |
1000 | <define entity="traffic-param" name="select-timeout-ms" value="1000"> |
| max-simultaneous-calls (tuning) | max-simultaneous-calls is the maximum number of simultaneous calls that can be placed by the tool. | (Duration of a call * call rate)* 1.2 | <define entity="traffic-param" name="max-simultaneous-calls" value="1000"> </define> |
| model-traffic-select | Specifies which distribution is selected to create new calls.Three different types are implemented: -uniform : for each interval, seagull tries to reach the expected call rate, regardless of what happened during the lastest interval. With this value, the max-receive and max-send options are automatically set. -best-effort : seagull tries to maintain the expected average call rate by adjusting the instantaneous call rate using the rates reached during the previous intervals. This is the default value. -poisson : the real call rate varies around the expected call rate according to the Poisson distribution |
best-effort | <define entity="traffic-param" name="model-traffic-select" value="best-effort"> </define> |
| external-data-file | File from which the data are taken for the external data management. | external_data.csv | <define entity="traffic-param" name="external-data-file" value="external_data.csv"> </define> |
| external-data-select | Defines the way the data are extracted from the external data file. Value can be sequential or random. | sequential | <define entity="traffic-param" name="external-data-select" value="sequential"> </define> |
Configuration parameters
For text protocol, it is possible to define configuration parameters. They are set in the configuration
file and the value of the parameter can be used in the scenario.
In the configuration file, the configuration parameters are defined:
<define entity="config-param"  name="param_ip" value="127.0.0.1"></define>
<define entity="config-param"  name="service"  value="schooler"></define>
In the scenario, the value is restored in the message (example for SIP protocol):
<message>
  <![CDATA[INVITE sip:$(service)@$(param_ip) SIP/2.0
      Via: SIP/2.0/UDP north.east.isi.edu
      From: Mark Handley <sip:mjh@isi.edu>
      To: Eve Schooler <sip:schooler@caltech.edu>
      Call-ID: 2963313058@north.east.isi.edu
      CSeq: 1 INVITE
      Subject: SIP will be discussed, too
      Content-Type: application/sdp
      Content-Length: 187 ]] >
</message>
(See "SIP first try" for a commented example)
Scenario reference
This section is the reference for Seagull scenarios.
This table is the list of commands that can be used in scenarios with their attributes.
List of scenario commands with their attributes
| Command | Attribute(s) | Description | Example |
|---|---|---|---|
| <send> | Send a message on a transport channel | ||
| channel | Refers to "transport-channel" entities, as defined in the generic configuration file. | channel="trans-ip-v4": Use trans-ip-v4 channel. | |
| label | Optional. Refers to correlation "command" entities, as defined in the correlation section. | label="command-1": refers to the "command-1". | |
| <receive> | Receive a message on a transport channel | ||
| channel | Refers to "transport-channel" entities, as defined in the generic configuration file. | channel="trans-ip-v4": Use trans-ip-v4 channel. | |
| label | Optional. Refers to correlation "command" entities, as defined in the correlation section. | label="command-1": refers to the "command-1". | |
| <wait-ms> | Wait a number of milliseconds before continuing | ||
| value | Number of milliseconds to wait for. | <wait-ms value="2000"></wait-ms>: wait for 2 seconds | |
| <counterdef> | Define a counter | ||
| name | Name of the counter | name="client-id-counter" | |
| init | Initial value of the counter | init="1" | |
| min | Optional. Minimal value of the counter. (Default value is 0) |
min="0" | |
| max | Optional. Maximal value of the counter. The interpretation of the value of this attribute depends on the platform and
corresponds to an Unsigned long defined in the file "limit.h". If "max" is defined, when the "max" value is reached, the counter is re-initialized to the value defined by the "behaviour" attribute. |
max="100" | |
| behaviour | Optional. Possible values of this attribute are: "init" : when the "max" value is reached, the counter is re-initialized to the "init" value, "min" : when the "max" value is reached, the counter is re-initialized to the "min" value, "no_reset": when the "max" value is reached, the counter is not re-initialized and stays at the "max" value. (Default value is "min") |
behaviour="init" |
This table is the list of actions that can be used in <send> or <receive> commands.
List of actions
| Action | Attribute(s) | Description | Example |
|---|---|---|---|
| <open> | 'open' action opens an instance of the transport channel. This can be used for example to open a new TCP socket for each call. Don't forget to use 'close' action at the end of the scenario. | <open args="mode=client;dest=10.10.11.157:8080"></open> | |
| args | Argument relevant to the transport channel used | mode=client;dest=10.10.11.157:8080 | |
| <close> | Close a transport channel | <close name="channel-1"></close> | |
| name | Name of the channel to be closed. | channel-1 | |
| <store> | Store the value of a protocol entity in a call variable | <store name="sid" entity="Session-Id"> </store> | |
| name | Name of the call variable where to store the protocol entity. | sid | |
| entity | Name of the protocol entity to store. It can be any protocol entity (body or header). | Session-Id | |
| instance | Instance identifier of the component to be stored. | instance="InitialDP-data" | |
| sub-entity | Identifier of the parameter of the component to be stored. | sub-entity="operation-code" | |
| begin | Position from which we start to get the data. Be careful, the count for the position starts at zero. Example for the second position: | begin="1" | |
| end | Position at which we stop to get the data. Be careful, the count for the position starts at zero and the last piece of injected data is at the end position minus one. | end="9" | |
| <restore> | Restore the value of a call variable in a protocol entity (reverse operation of "store") | <restore name="sid" entity="Session-Id"></restore> | |
| name | Name of the call variable where to restore from. | sid | |
| entity | Name of the protocol entity to restore to. | Session-Id | |
| instance | Instance identifier of the component to be restored. | instance="InitialDP-data" | |
| sub-entity | Identifier of the parameter of the component to be restored. | sub-entity="operation-code" | |
| begin | Position at which we start to inject the data. Be careful, the count for the position starts at zero. Example for the second position: | begin="1" | |
| end | Position at which we stop to inject the data. Be careful, the count for the position starts at zero and the last piece of injected data is at the end position minus one. | end="9" | |
| <start-timer> | Start the timer for response time statistics | - | |
| <stop-timer> | Stop the timer for response time statistics | - | |
| <set-value> | - | Set the value of a protocol entity given a format | <set-value name="Session-Id" format=".;1096298391;$(session-counter)"> </set-value> |
| name | Name of the protocol entity to set | "Session-Id" set the value of Session-Id parameter | |
| format | The format is a string that can contain call variables (identified by $(varname)). If associated to the "method" attribute, it is used to pass parameters to the method (refer to Authentication for further details). |
".;1096298391;$(session-counter)": fixed string with a variable part (value of "session-counter" call variable) | |
| method | Optional. The method refers to an "external-method" of the dictionary. It defines the function to encode the value. | "authentication" | |
| message_part | Optional and only if the "method" attribute is used. The message_part defines the part of the message that is used by the method to encode the value.
Allowed values are : "" (default value) "body" "header" "all" |
"" | |
| <set-bit> | - | Set the value of a bit in a call variable (memory zone). This is only available for variables of number or string type. Value can only be 0 or 1. The position starts at 0 (second position is 1). | <set-bit name="call-variable" entity="field-from-dictionary" instance="InitialDP-data" sub-entity="operation-code" position="x" value="y"></set-bit> |
| name | Name of the call variable where to store the protocol entity. | sid | |
| entity | Name of the stored protocol entity. Needed to determine the type of the call variable. | Session-Id | |
| instance | Instance identifier of the component to be stored. | instance="InitialDP-data" | |
| sub-entity | Identifier of the parameter of the component to be stored. | sub-entity="operation-code" | |
| position | Position of the bit to be changed. Position starts at 0. Example for the second position: | position="1" | |
| value | New value of the bit. Admitted values are 0 or 1. | value="0" | |
| <set-value-bit> | - | Set the value of a bit in a field of a message. This is only available for variables of number or string type. Value can only be 0 or 1. The position starts at 0 (second position is 1). | <set-value-bit entity="field-from-dictionary" instance="InitialDP-data" sub-entity="operation-code" position="x" value="y"> </set-value-bit> |
| entity | Name of the stored protocol entity. Needed to determine the type of the call variable. | Session-Id | |
| instance | Instance identifier of the stored component. | instance="InitialDP-data" | |
| sub-entity | Identifier of the parameter of the stored component. | sub-entity="operation-code" | |
| position | Position of the bit to be changed. Position starts at 0. Example for the second position: | position="1" | |
| value | New value of the bit. Admitted values are 0 or 1. | value="0" | |
| <setfield> | - | Set the value of a field of a message. This is only available for external (header and body fields) and binary (header fields only) protocols. | <setfield name="field-from-dictionary" value="XX"></setfield> |
| name | Name of the protocol field. | name="field-from-dictionary" | |
| value | Value of the field. | value="XX" | |
| <inc-counter> | Increment a global counter | <inc-counter name="HbH-counter"> </inc-counter> | |
| name | Name of the global counter to increment | "HbH-counter" increment the value of HbH-counter by 1 | |
| <inc-var> | Increment a variable of a call | <inc-var name="INVOKE-ID"> </inc-var> | |
| name | Name of the call variable to increment | "INVOKE-ID" increment the value of INVOKE-ID by 1 | |
| <check-presence> | Check that a protocol entity is present | <check-presence name="[FIELD_NAME]" behaviour="error"></check-presence> | |
| name | Name of the protocol entity to check | name="bar" for bar field | |
| behaviour | Behaviour to adopt in case the protocol entity is missing. Can be "error" or "warning" | behaviour="error" | |
| instance | Instance identifier of the component to be checked. | instance="InitialDP-data" | |
| occurrence | Optional (default is 1).Specifies the position of the field,in case of multiple occurrences (used with grouped AVPs in diameter). | occurrence="1" | |
| <check-value> | Check the value of a header field or of a message paramater | <check-value name="[FIELD_NAME]" behaviour="error"></check-value> | |
| name | Name of the protocol entity to check | name="bar" for bar field | |
| behaviour | Behaviour to adopt in case the value is not the expected one. Can be "error" or "warning" | behaviour="error" | |
| instance | Instance identifier of the component to be checked. | instance="InitialDP-data" | |
| sub-entity | Identifier of parameter of the component to be checked. | sub-entity="operation-code" | |
| branch_on | Specifies the received message,on which the scenario execution is branched,to point either ahead,or back in the scenario. | branch_on="180" | |
| look_ahead | (default 1)Specifies the number of jumps in traffic section of the scenario ahead. | look_ahead="2" | |
| look_back | (default 0).Specifies the number of jumps in traffic section of the scenario backwards. | look_back="1" | |
| <check-order> | Check the type of message received at a specified position | <check-order name="[FIELD_NAME]" behaviour="error" position="[X]"> </check-order> | |
| name | Name of the message to check | name="bar" for bar message | |
| behaviour | Behaviour to adopt in case the position is not the one expected. Can be "error" or "warning" | behaviour="error" | |
| position | Position at which the message is awaited. Be careful: positions start at 0. | position="0" | |
| <restore-from-external> | Modify the value of a field with data coming from a file | <restore-from-external field="1" entity="Volume_requested"> </restore-from-external> | |
| field | The number of the data field used, in the data file | field="0" for the first field | |
| entity | The field of the message to which is assigned the new value | entity="Volume_requested" | |
| sub-entity | Identifier of component parameter in which we insert some data. | sub-entity="operation-data" | |
| instance | Instance identifier of the component to be checked. | instance="InitialDP-data" | |
| begin | Position at which we start to inject the data. Be careful, the count for the positions start at zero. Example for the second position: | begin="1" | |
| end | Position at which we stop to inject the data. Be careful, the count for the positions start at zero, and the last piece of data injected is at end position minus one. | end="9" | |
| occurrence | Optional (default is 1).Specifies the position of the field,in case of multiple occurrences (used with grouped AVPs in diameter). | occurrence="1" | |
| <restore-from-external> | Restore a value with data coming from a file into a call variable | <restore-from-external name="call_variable" field="1"> </restore-from-external> | |
| name | The field of the message to which is assigned the new value | entity="Volume_requested" | |
| field | The number of the data field used, in the data file | field="0" for the first field | |
| <set-new-session-id> | Change the value by which a session (scenario execution) is identified. This allows scenarios to be executed with multiple session-ids in one scenario. See H248 for an example. | <set-new-session-id name="TID" entity="transaction-id"></set-new-session-id> | |
| name | Value that was used to identify the session (can be a variable that was stored or a counter). | name="TID" | |
| entity | New value to use to identify the session (like the value of a protocol field) | name="transaction-id" | |
| <transport-option> | Change the mode from no secure to secure transport during execution. A "wait-ms" (with value="1000" at least) command is needed after this action to let systems synchronize the secure mode. | <transport-option channel="channel-1" value="secure-mode"></transport-option> | |
| channel | Value that was used to identify the channel. | channel="channel-1" | |
| value | "secure-mode" indicates that the mode will change to secure (the only agreed value). | value="secure-mode" | |
| <insert-in-map> | Specific to "Correlation" feature. It inserts in the list of known session-ids for the given "channel" the value of the "entity" (that is defined in the dictionary). | <insert-in-map channel="channel-1" entity="HbH-id"></insert-in-map> | |
| channel | Value that was used to identify the channel. | channel="channel-1" | |
| entity | Add the value of the "entity" to te map of known session-ids. | ||
| <log> | Add a user comments in the log file (with the possibility to dump variables, stored with the "store" action, and counters). To activate user logs, the "U" log level is needed in the command line. | <log format="User log, call-id= $(SID)"></log> | |
| format | User comment to be added to the log file. | format="User log, call-id= $(SID)" |
Command line arguments
$ seagull -help
seagull Command syntax
 -conf <configuration file name>
 -scen <scenario file name>
 -dico <protocol dictionary file name> can be used more than once
[ -log <logging file name> ]
[ -llevel <logging level mask> ] levels:
          M: msg,     B: buffer,   E: error,
          W: warning, N: no error, T: traffic error,
          V: Verdict, U: User,     A: all.      Default E
[ -help  ] display syntax command line
[ -bg  ] background mode
[ -notimelog  ] no time stamp on the log (default time stamp)
[ -msgcheck  ] check the field of the messages received (default no check)
Seagull return code
Seagull returns a global status of the calls through the return code:
- 0 : ok, seagull did not meet any problems and all calls finished well.
- -1 : fatal error, seagull met a fatal error and stopped.
- >1 : error, at least, one call failed ("Ignored" calls are not considered as failed; the init section is concidered as a independant call).
Miscellaneous tools
When working with Seagull, there are some useful and complementary tools:
- Wireshark: formerly known as "Ethereal", Wireshark is a protocol decoder. It will most likely decode all the protocols supported by Seagull.
- Visual REGEXP: this invaluable tool can be used to debug regular expressions (widely used in Seagull!).